背景 由于工作比较忙,有段时间没有更了,快到年底了,就当是总结了。今年主要精力都是在围绕着安全运营这一块的工作,随着工作的开展发现自己“组装” 的SIEM用起来不是很“舒服 ”。这是我之前写的一篇《Wazuh-如何对异构数据进行关联告警
“散装”SIEM 主要是建立在ELK的框架之上,告警模块分别采用了Wazuh与Elastalert。早期为了使Wazuh能够消费异构数据(WAF、NTA、EDR) 并进行关联告警,我在数据入库之前利用Logstash对异构数据进行了标准化,同时Wazuh对标准化后的数据进行关联。例如:Suricata通过Filebeat将告警事件发出,由Logstash统一进行标准化处理并同时输出到Elastic以及Wazuh。其中Elastic为告警的元数据,推送到Wazuh上的为标准化后的安全事件。
“散装”SIEM v0.1的不足与改进措施 1. 数据标准化 由于前期的标准化未采用**ECS **(Elastic Common Schema ),导致后期沿用Elastic生态的时候出现了使用上的不便。大家都知道ES在7.X的版本推出了SIEM这个功能,如果想使用Elastic SIEM进行分析的话,那么ECS是首选。这里为了后期与开源生态更好的进行融合,需要将原先的标准化转为ECS的格式。
2. 告警丰富化 为了更有效的提升告警质量,提高安全分析的效率。需要对入库的安全事件以及产生的告警进行必要的丰富化。
利用CMDB平台的数据对内部资产进行丰富化。例如增加:部门、业务、应用类型、负责人等字段。
对接威胁情报数据,SIEM会对告警事件的攻击IP进行情报侧数据的丰富化;
本地威胁情报(曾经攻击过我们的IP地址)
第三方威胁情报
敏感接口监控(如:登录接口、支付接口、钱包接口)。利用第三方数据对IP地址进行Proxy标记,为后期风控的研判提供一些数据支撑;
为安全事件增加方向与区域的字段。便于分析人员第一时间识别内对内 以及内对外 的告警。也可针对方向进行告警级别的权重调整;
3. 提升检测能力 底层安全设备的检测能力与安全事件的可信度,是直接影响SIEM告警的关键因素。
接入Imperva WAF的告警数据,与Suricata进行自动化关联,定期将绕过的规则“移植”到前端的Imperva WAF上,加强边界的安全防护能力;
“消费”AWS VPC FLOW数据,增加内对外 的异常连接检测能力。由于是四层数据能够被“消费” 的维度实在不多。主要实现了以下几种告警:
周期性连接告警
威胁情报类告警
端口扫描类告警
短时间内,内网主机请求相同目的IP的多个端口
短时间内,内网主机请求多个IP的相同目的端口
敏感端口请求告警
4. 溯源分析 目前SIEM产生的告警,并不会携带原始的安全事件,这对于分析小伙伴来说并不友好,特别是告警量比较多的时候。
现已为每一个告警增加了**”Hunting”**的字段,通过该字段可直接溯源到底层的安全事件;
增加了更适用于安全分析人员使用的仪表盘;
编写了一个自认为 比较贴合分析人员使用的工具:HappyHunting ;
5. 其他改进
解决了SIEM联动CDN WAF API响应时间过长(15-20分钟 😅)的问题。目前与Imperva WAF API联动已做到了准实时。
优化NTA login_audit代码,提升NTA性能。之前写过一篇文章《**Suricata + Lua实现本地情报对接 **》,主要利用了Lua脚本对“敏感”接口进行登录审计并利用情报进行高危账号检测。现已将这部分功能移植到Logstash + Ruby上;
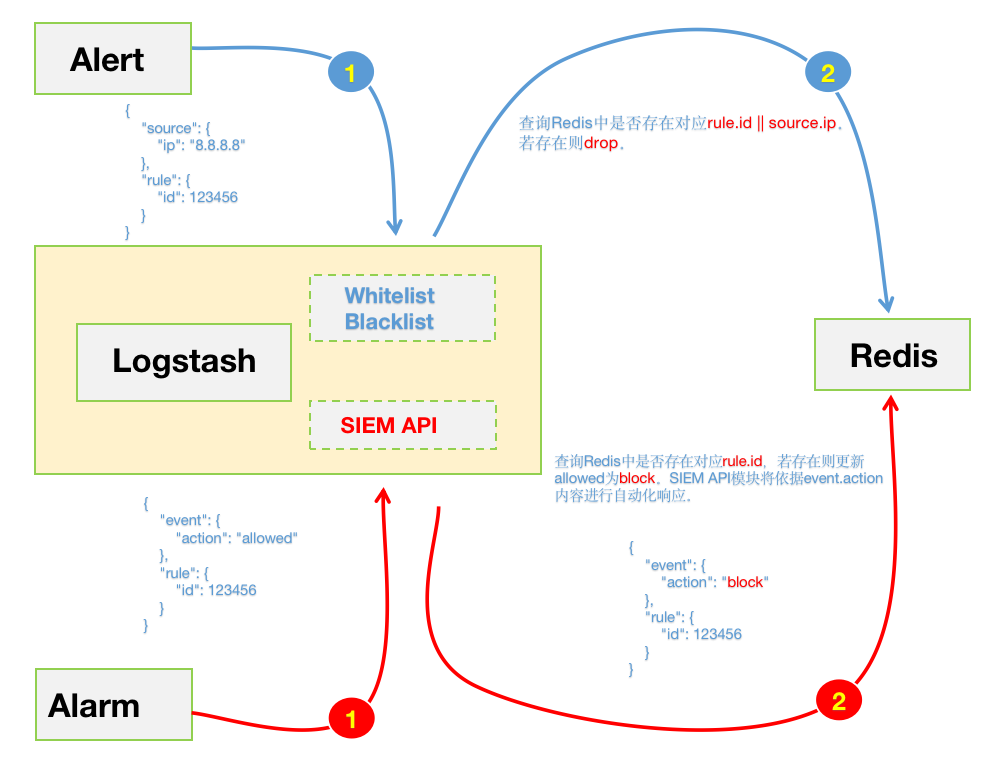
之前的自动化联动规则都是通过手动修改脚本调整rule.id 来实现,这种方式在初期还能勉强运行。但在后期运行中暴露出了不足,既不便于管理也增加了维护的成本。所以为了维护SIEM的规则,这里采用了Redis来进行规则的统一管理。后期只需要将需要阻断的rule.id 推送至Redis即可。同时也在输出的告警中通过event.action 字段标准该告警的响应方式;
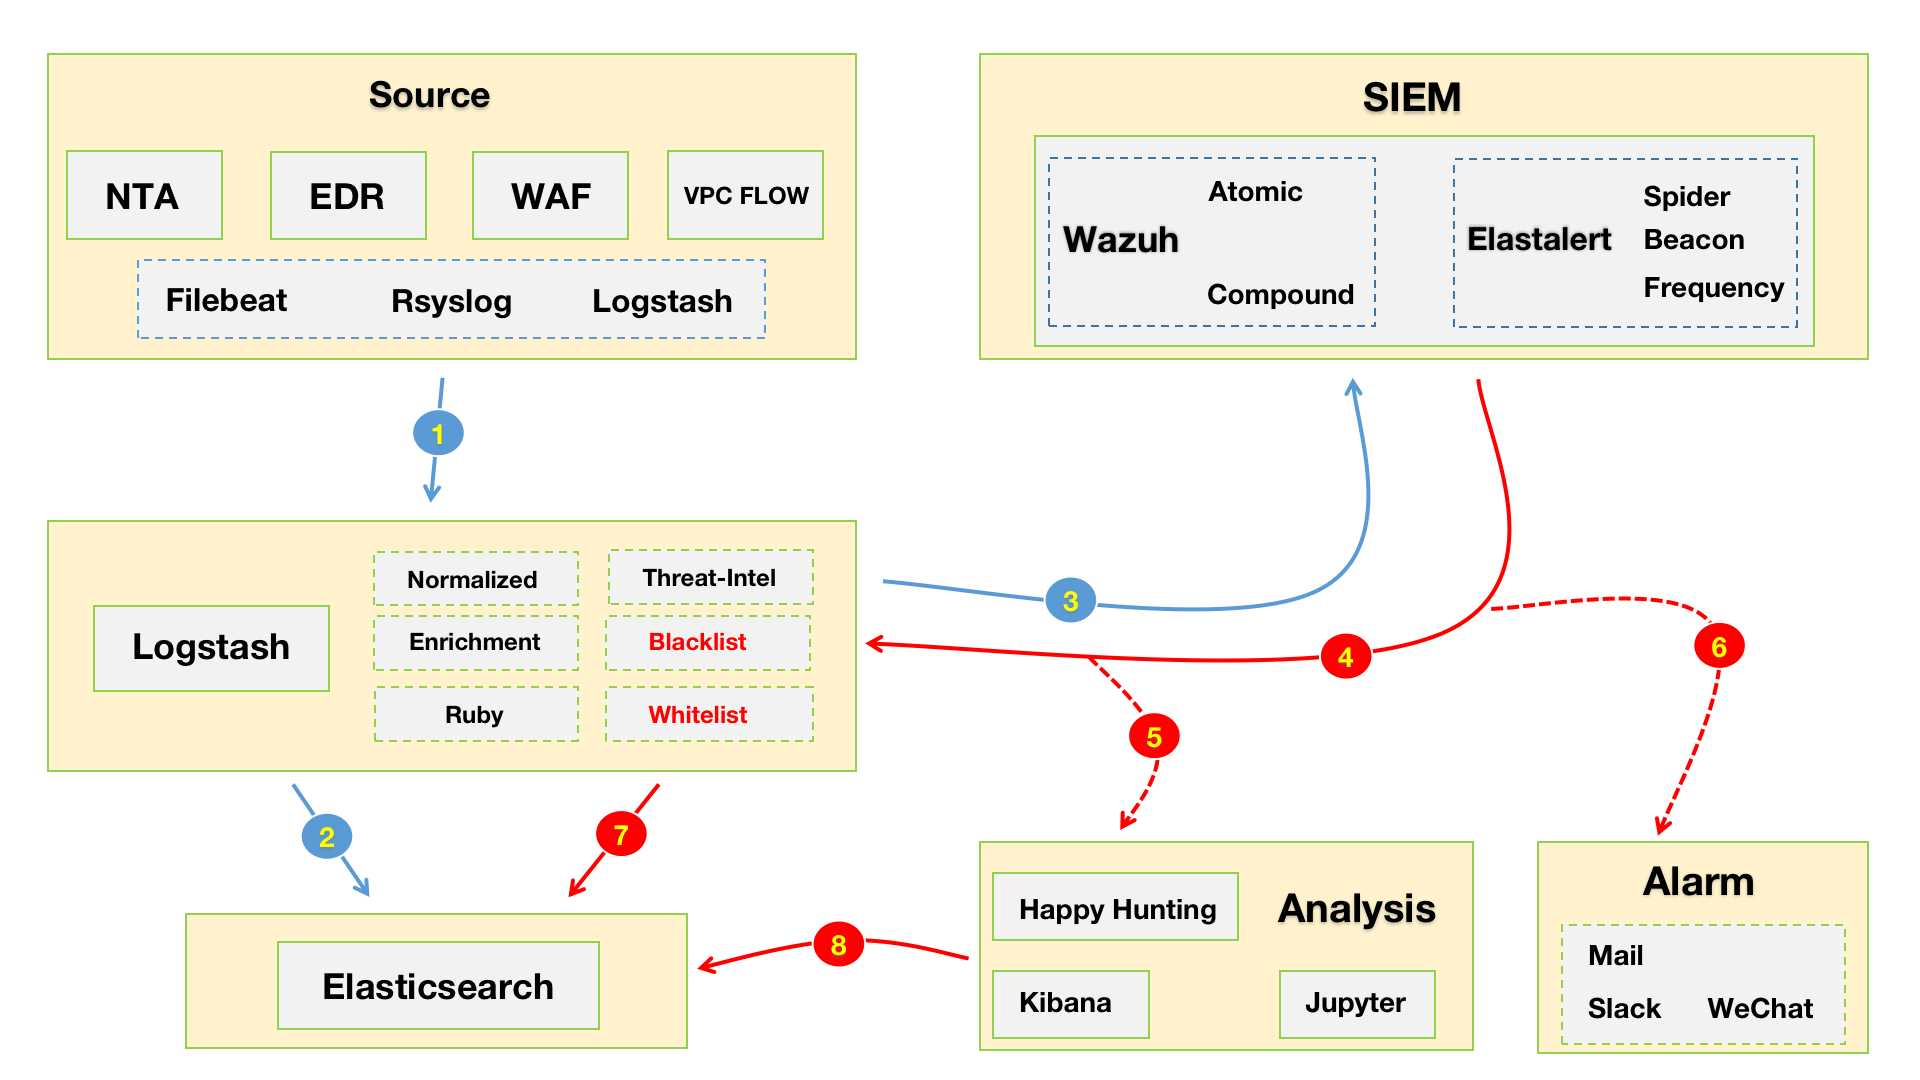
“进化” - “散装”SIEM v0.2 1. Workflow 这是重新调整之后的“散装”SIEM v0.2 的workflow😁。如下图所示,数据源采集端这里就不展开来说了,都是现成的工具发就完事儿了。下面主要说一下Logstash中对数据处理的部分:
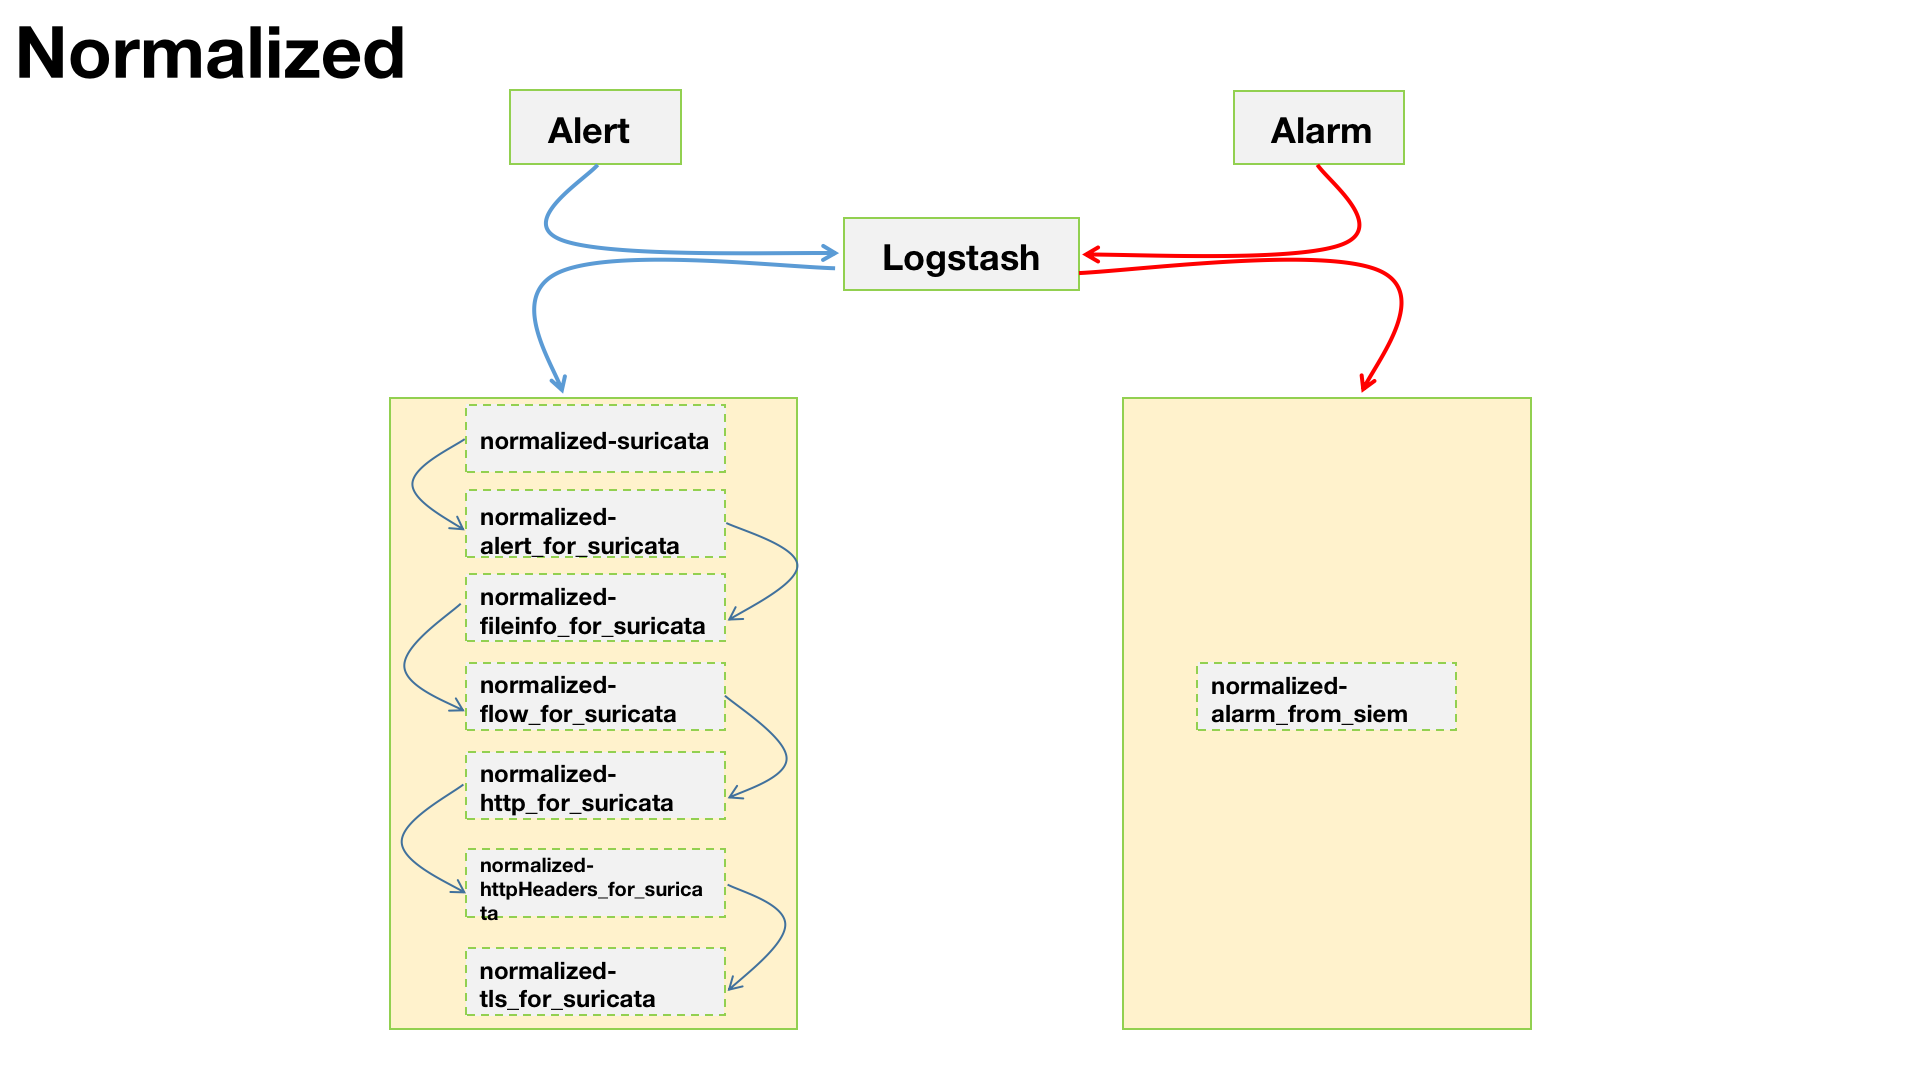
2. 数据处理 1. Normalized
1.1 normalized-alert_to_siem 针对alert事件进行标准化,也就是安全设备发出的数据。参考上图中蓝色线所示部分
官方已支持Suricata数据的ECS,我们可直接启用filebeat的Suricata模块。但是 ,这里需要注意一点,默认Suricata的模块中有一些标准化是交由Elastic来做的。由于我们需要利用Logstash做后续的ETL部分,所以现在的整个数据流是:Filebeat -> Logstash -> Elastic 。那么,这一部分的标准化,需要我们在Logstash层面来实现。具体涉及到的配置如下:
1.1.1 normalized-suricata 通用Suricata事件标准化配置。
删除一些filebeat自带的字段。
增加provider、product、sensor等字段,为了后期区分不同的数据源类型,(例:NTA、WAF、EDR ),以及不同的NTA产品(例:Suricata、Zeek )
Logstash Config 1 2 3 4 5 6 7 8 9 10 11 12 13 14 15 filter { mutate { remove_field => [ "application" , "type" , "agent" , "@version" , "[event][original]" ] add_field => { "provider" => "Suricata" "product" => "IDS" "sensor" => "%{[host][name]}" } lowercase => [ "[network][transport]" ] } uuid { target => "[event][id]" overwrite => true } }
1.1.2 normalized-alert_for_suricata Logstash Config 1 2 3 4 5 6 7 8 9 10 11 12 13 14 15 16 17 18 19 20 21 22 23 24 25 26 27 28 29 30 31 32 33 34 35 36 37 38 39 40 41 42 43 44 45 46 47 48 49 50 51 52 53 54 55 56 57 58 59 60 61 62 63 64 65 66 67 68 69 filter { if [suricata][eve][alert] { mutate { rename => { "[suricata][eve][alert][category]" => "[rule][category]" "[suricata][eve][alert][signature_id]" => "[rule][id]" "[suricata][eve][alert][signature]" => "[rule][name]" "[suricata][eve][alert][rule]" => "[rule][description]" } } mutate { convert => { "[rule][id]" => "integer" } copy => { "[rule][category]" => "message" } } if [suricata][eve][alert][action] == "blocked" { mutate { update => { "[suricata][eve][alert][action]" => "denied" } } } if [suricata][eve][alert][action] { ruby { code => " action = event.get('[suricata][eve][alert][action]') event_type = event.get('[event][type]') if event_type then event_type = event.get('[event][type]').push(action) else event_type = [action] end event.set('[event][type]', event_type) event.remove('[suricata][eve][alert][action]') event.set('[event][action]', action) " } } mutate { rename => { "[suricata][eve][alert][severity]" => "[event][severity]" "[suricata][eve][payload_printable]" => "[rule][payload]" "[suricata][eve][http][http_request_body_printable]" => "[http][request][body][content]" "[suricata][eve][http][http_response_body_printable]" => "[http][response][body][content]" } } ruby { code => " rule_id = event.get('[rule][id]') rule_name = event.get('[rule][name]') event_id = event.get('[event][id]') event.set('[related][rule][id]', [rule_id]) event.set('[related][rule][name]', [rule_name]) event.set('[related][event][id]', [event_id]) " } } }
1.1.3 normalized-fileinfo_for_suricata Logstash Config 1 2 3 4 5 6 7 8 9 10 filter { if [suricata][eve][fileinfo] { mutate { rename => { "[suricata][eve][fileinfo][filename]" => "[file][path]" "[suricata][eve][fileinfo][size]" => "[file][size]" } } } }
1.1.4 normalized-flow_for_suricata Logstash Config 1 2 3 4 5 6 7 8 9 10 11 12 13 14 15 16 17 18 19 20 21 22 23 24 25 26 27 28 29 30 31 32 33 34 35 36 37 38 39 40 41 42 43 44 45 46 47 48 49 50 51 52 53 54 55 56 57 58 59 60 61 62 63 64 65 66 67 filter { if [suricata][eve][flow] { mutate { rename => { "[suricata][eve][flow][pkts_toclient]" => "[destination][packets]" "[suricata][eve][flow][pkts_toserver]" => "[source][packets]" "[suricata][eve][flow][bytes_toclient]" => "[destination][bytes]" "[suricata][eve][flow][bytes_toserver]" => "[source][bytes]" } } ruby { init => " @sb = 0 @sp = 0 @db = 0 @dp = 0 " code => " events = event.to_hash if events.has_key?('source') then @sb = events['source'].fetch('bytes', 0) @sp = events['source'].fetch('packets', 0) end if events.has_key?('destination') then @db = events['destination'].fetch('bytes', 0) @dp = events['destination'].fetch('packets', 0) end if (@sb+@db+@sp+@dp > 0) then if (@sb+@db > 0) then event.set('[network][bytes]', @sb+@db) end if (@sp+@dp > 0) then event.set('[network][packets]', @sp+@dp) end end " } date { match => [ "[suricata][eve][flow][start]" , "ISO8601" ] target => "[event][start]" } date { match => [ "[suricata][eve][flow][end]" , "ISO8601" ] target => "[event][end]" } mutate { rename => { "[suricata][eve][flow][age]" => "[event][duration]" } } mutate { remove_field => [ "[suricata][eve][flow][start]" , "[suricata][eve][flow][end]" ] } } }
1.1.5 normalized-http_for_suricata Logstash Config 1 2 3 4 5 6 7 8 9 10 11 12 13 14 15 16 17 18 19 20 21 22 23 24 25 26 27 28 29 30 31 32 33 34 35 36 37 38 39 40 41 42 43 44 45 46 filter { if [suricata][eve][http] { mutate { rename => { "[suricata][eve][http][http_method]" => "[http][request][method]" "[suricata][eve][http][status]" => "[http][response][status_code]" "[suricata][eve][http][hostname]" => "[destination][domain]" } } if [destination][domain] and [network][protocol] == "http" { mutate { copy => { "[destination][domain]" => "[url][domain]" } } } ruby { init => " @pattern = /(?<path>[^?#]*)(?:\?(?<query>[^#]*))?(?:#(?<fragment>.*))?/ " code => " url = event.get('[suricata][eve][http][url]') res = @pattern.match(url) if res['path'] then event.set('[url][path]', res['path']) end if res['query'] then event.set('[url][query]', res['query']) end if res['fragment'] then event.set('[url][fragment]', res['fragment']) end " } mutate { rename => { "[suricata][eve][http][url]" => "[url][original]" "[suricata][eve][http][http_refer]" => "[http][request][referrer]" "[suricata][eve][http][length]" => "[http][response][body][bytes]" "[suricata][eve][http][http_user_agent]" => "[user_agent][original]" } } } }
当Suricata 设置dump-all-headers:both时,会将HTTP头全部输出。对于http_audit这个需求而言是个很好的功能,只不过输出的格式有点坑😂😂😂。为了更方便的在Kibana上进行筛选,我对这部分数据进行了标准化。😁
Logstash Config 1 2 3 4 5 6 7 filter { if [suricata][eve][http] { ruby { path => "/etc/logstash/scripts/normalized_http_headers.rb" } } }
Ruby Code 1 2 3 4 5 6 7 8 9 10 11 12 13 14 15 16 17 18 19 20 21 22 23 24 25 26 27 28 29 def filter (event) request = {} response = {} request_headers = event.get("[suricata][eve][http][request_headers]" ) response_headers = event.get("[suricata][eve][http][response_headers]" ) if request_headers then request_headers.each do |headers| name = headers['name' ].downcase value = headers['value' ] request[name] = value end end if response_headers then response_headers.each do |headers| name = headers['name' ].downcase value = headers['value' ] response[name] = value end end event.remove("[suricata][eve][http][request_headers]" ) event.remove("[suricata][eve][http][response_headers]" ) event.set("[suricata][eve][http][request]" , request) event.set("[suricata][eve][http][response]" , response) return [event] end
示例 1 2 3 4 5 6 7 8 9 10 11 12 13 14 { "request_headers" : [ { "name" : "Connection" , "value" : "Keep-Alive" } ], "response_headers" : [ { "name" : "Server" , "value" : "NWS_TCloud_S11" } ] }
1 2 3 4 5 6 7 8 9 10 11 12 13 14 15 16 17 18 19 { "http" : { "request" : { "host" : "192.168.199.1:25782" , "connection" : "Close" , "cache-control" : "no-cache" , "pragma" : "no-cache" , "user-agent" : "Microsoft-Windows/10.0 UPnP/1.0" , "accept" : "text/xml, application/xml" }, "response" : { "ext" : "" , "content-length" : "2645" , "server" : "RT-N56U/3.4.3.9 UPnP/1.1 MiniUPnPd/2.0" , "content-type" : "text/xml; charset=\"utf-8\"" , "connection" : "close" } } }
1.1.7 normalized-tls_for_suricata Logstash Config 1 2 3 4 5 6 7 8 9 10 11 12 13 14 15 16 17 18 filter { if [suricata][eve][tls] { mutate { uppercase => [ "[tls][server][hash][sha1]" ] split => { "[tls][server][hash][sha1]" => ":" } join => { "[tls][server][hash][sha1]" => "" } copy => { "[tls][server][hash][sha1]" => "[related][hash]" } } } }
1.2 normalized-alarm_from_siem 针对alarm事件进行标准化,也就是SIEM发出的数据。参考上图中红色线所示部分
1.2.1 normalized-alarm 通用alarm事件标准化配置。
Logstash Config 1 2 3 4 5 6 7 8 9 10 11 12 13 14 15 16 17 18 19 20 21 22 23 24 25 26 27 28 29 30 31 32 33 34 35 36 37 38 39 40 41 42 43 44 45 46 47 48 49 50 51 52 53 54 55 56 57 58 59 60 61 62 63 64 65 66 67 68 69 70 71 72 73 74 75 76 77 78 79 80 81 82 83 84 85 86 87 88 filter { date { match => ["timestamp" , "ISO8601" ] target => "timestamp" } mutate { rename => { "[data][source]" => "source" "[data][destination]" => "destination" "[data][network]" => "network" "[data][event]" => "event" "[data][fileset]" => "fileset" "[data][http]" => "http" "[data][url]" => "url" "[data][user_agent]" => "user_agent" "[data][related]" => "related" "[data][threat]" => "threat" "[rule][groups]" => "[rule][ruleset]" } convert => { "[event][severity]" => "integer" "[rule][id]" => "integer" "[related][rule][id]" => "integer" "[network][bytes]" => "integer" "[network][packets]" => "integer" "[source][port]" => "integer" "[source][bytes]" => "integer" "[source][packets]" => "integer" "[destination][port]" => "integer" "[destination][bytes]" => "integer" "[destination][packets]" => "integer" "[http][response][status_code]" => "integer" "[http][response][body][bytes]" => "integer" } remove_field => [ "beat" , "input_type" , "tags" , "count" , "@version" , "ecs" , "log" , "offset" , "type" , "host" , "predecoder" , "decoder" , "[data][rule]" ] copy => { "[rule][description]" => "[rule][name]" } } if [event][kind] == "alarm" { mutate { rename => { "previous_output" => "[related][event][log]" } } ruby { code => " src_ip = event.get('[source][ip]') dst_ip = event.get('[destination][ip]') src_port = event.get('[source][port]').to_s dst_port = event.get('[destination][port]').to_s rule_name = event.get('[related][rule][name]')[0].to_s rule_description = src_ip + ':' + src_port + ' -> ' + dst_ip + ':' + dst_port + ' -> ' + rule_name event.set('[rule][description]', rule_description) if event.get('[related][rule][id]') then sid = event.get('[related][rule][id]')[0] event.set('[rule][uuid]', sid) end event.set('[rule][category]', 'Frequency') " } } }
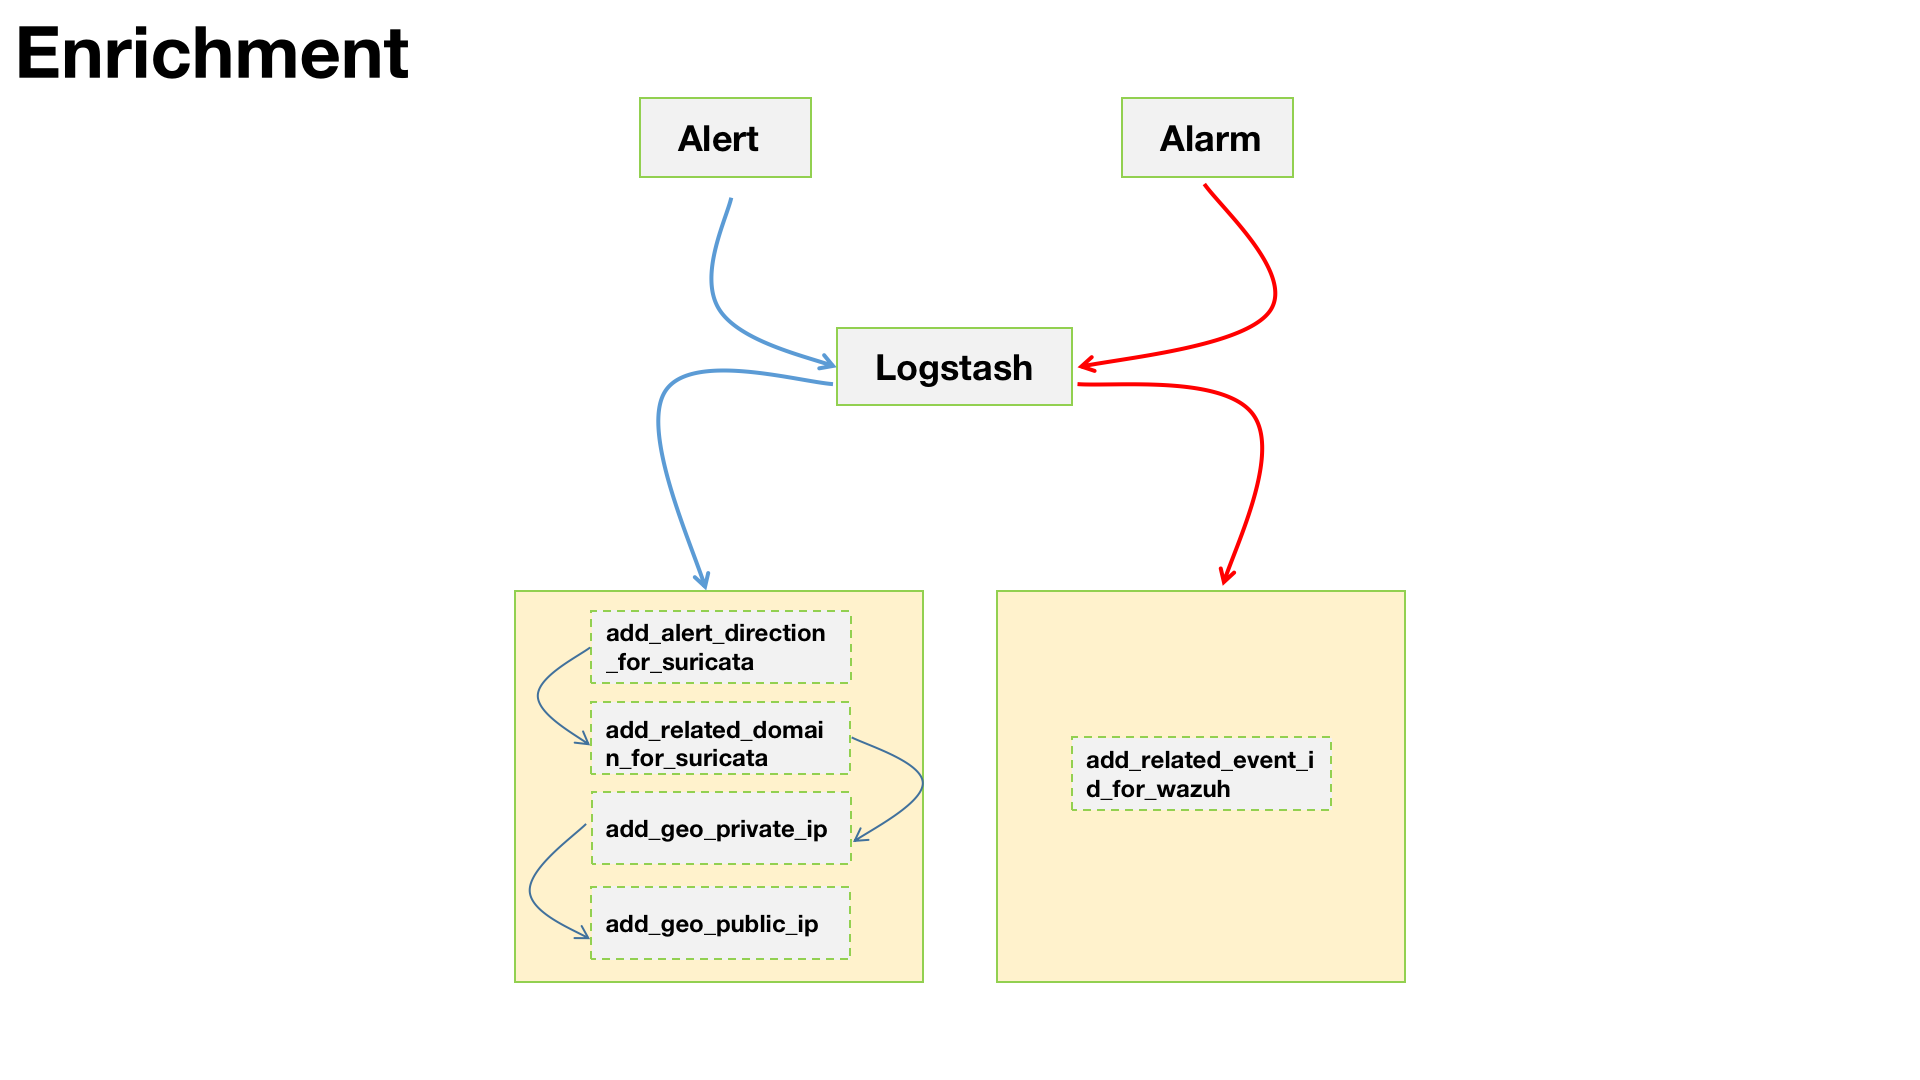
2. Enrichment
2.1 enrichment_alert_to_siem 针对alert事件进行丰富化,也就是安全设备发出的原始安全事件。参考上图中蓝色线所示部分
2.1.1 enrichment-alert_direction_for_suricata 由于一些特殊原因,我不得不将suricata.yaml 配置文件中的EXTERNAL_NET = any。这也导致了部分Suricata告警的误报,毕竟放开了规则的方向这个收敛条件。所以,我利用了Logstash 在数据入库到SIEM之前做了一层过滤。
Logstash Config 1 2 3 4 5 6 7 filter { if [rule][description] { ruby { path => "/etc/logstash/scripts/add_direction.rb" } } }
Ruby Code 1 2 3 4 5 6 7 8 9 10 11 12 13 14 15 16 17 18 19 20 21 22 23 24 25 26 27 28 29 30 31 32 33 34 35 36 37 38 39 40 41 42 43 44 45 46 47 48 49 50 51 require "ipaddr" def filter (event) src_ip = event.get("[source][ip]" ) dst_ip = event.get("[destination][ip]" ) if not src_ip or not dst_ip then event.cancel return [] end ipaddr_src = IPAddr.new src_ip ipaddr_dst = IPAddr.new dst_ip rule = event.get("[rule][description]" ) src_direction = rule.split(" " )[2 ] dst_direction = rule.split(" " )[5 ] src_private = ipaddr_src.private?() dst_private = ipaddr_dst.private?() if event.get("provider" ) == "Suricata" then if ( src_private ) and ( src_direction == "$EXTERNAL_NET" ) then event.cancel return [] end if ( dst_private ) and ( dst_direction == "$EXTERNAL_NET" ) then event.cancel return [] end end if src_private and dst_private then direction = "outbound" zone = "internal" elsif src_private and not dst_private then direction = "outbound" zone = "internal" elsif not src_private and dst_private then direction = "inbound" zone = "external" else direction = "inbound" zone = "external" end event.set("[network][direction]" , direction) event.set("[network][zone]" , zone) return [event] end
2.1.2 enrichment_related_domain_for_suricata 为了便于后期做关联分析,增加了攻击者与域名的关联字段。
Logstash Config 1 2 3 4 5 6 7 8 9 10 11 filter { if [url][domain] { ruby { code => " source_ip = event.get('[source][ip]') url_domain = event.get('[url][domain]') event.set('[related][domain]', [source_ip, url_domain]) " } } }
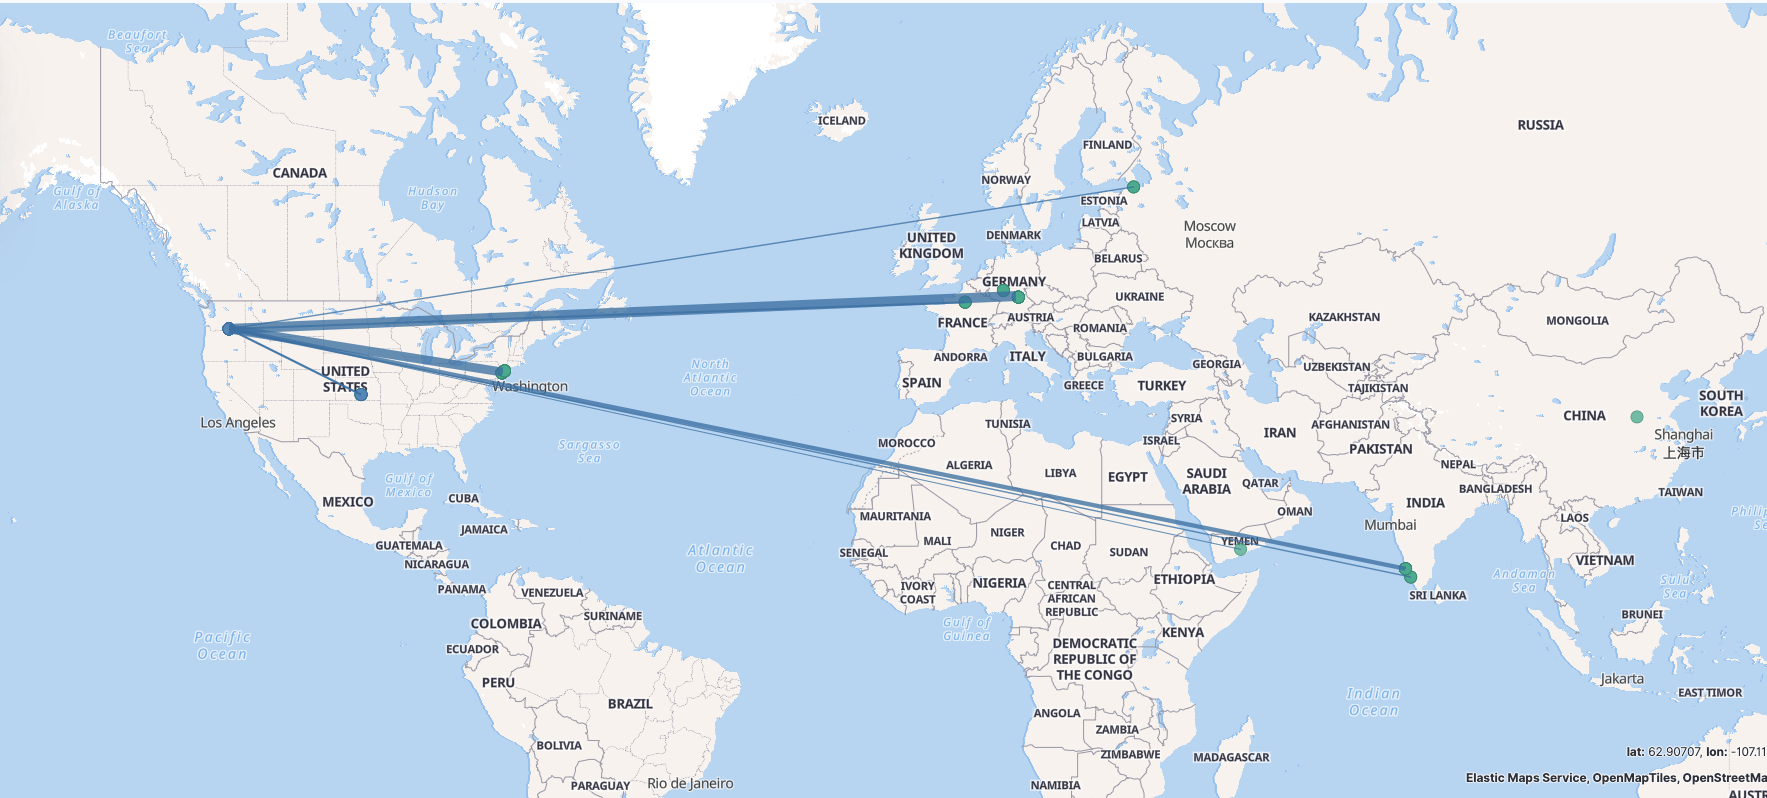
2.1.3 add_geo-private_ip 为内网IP增加地理位置标示,主要是为了Dashboard 展示的时候可以看到资产在地图上的坐标。地图炮?BIUBIUBIU? 😂。由于不是外网IP没办法加载GeoIP进行匹配,这里使用了Translate 这个插件来进行配置。
Logstash Conifg 1 2 3 4 5 6 7 8 9 10 11 12 13 14 15 16 17 18 19 20 21 22 23 24 25 26 27 28 29 30 31 32 33 34 35 36 37 38 39 40 41 42 43 44 45 46 47 48 49 50 51 52 53 54 55 56 57 58 59 60 61 62 63 64 65 66 67 filter { translate { regex => true exact => true dictionary_path => "/etc/logstash/scripts/private_ip_geo.yml" field => "[source][ip]" destination => "translation_geo" } json { source => "translation_geo" target => "[source][geo]" skip_on_invalid_json => true } translate { regex => true exact => true dictionary_path => "/etc/logstash/scripts/private_ip_asn.yml" field => "[source][ip]" destination => "translation_as" } json { source => "translation_as" target => "[source][as]" skip_on_invalid_json => true } mutate { remove_field => [ "translation_geo" , "translation_as" ] } } filter { translate { regex => true exact => true dictionary_path => "/etc/logstash/scripts/private_ip_geo.yml" field => "[destination][ip]" destination => "translation_geo" } json { source => "translation_geo" target => "[destination][geo]" skip_on_invalid_json => true } translate { regex => true exact => true dictionary_path => "/etc/logstash/scripts/private_ip_asn.yml" field => "[destination][ip]" destination => "translation_as" } json { source => "translation_as" target => "[destination][as]" skip_on_invalid_json => true } mutate { remove_field => [ "translation_geo" , "translation_as" ] } }
Yaml 1 '192.168.199.\d+' : '{"location":{"lat":45.8491,"lon":-119.7143},"country_name":"China","country_iso_code":"CN","region_name":"Jiangsu","region_iso_code":"JS","city_name":"Nanjing"}'
1 '192.168.199.\d+' : '{"number":4134,"organization.name":"CHINANET-BACKBONE"}'
示例
2.1.4 add_geo-public_ip 外网IP就比较好搞定了直接加载GeoIP数据即可。
Logstash Conifg 1 2 3 4 5 6 7 8 9 10 11 12 13 14 15 16 17 18 19 20 21 22 23 24 25 26 27 28 29 30 31 32 33 34 35 36 37 38 39 40 41 42 43 44 45 46 47 48 49 50 51 52 filter { if ! [source ][geo] { geoip { source => "[source][ip]" target => "[source][geo]" fields => ["city_name" , "country_name" , "country_code2" , "region_name" , "region_code" , "location" ] database => "/etc/logstash/GeoLite2-City.mmdb" } geoip { source => "[source][ip]" target => "[source][as]" fields => ["autonomous_system_organization" , "autonomous_system_number" ] database => "/etc/logstash/GeoLite2-ASN.mmdb" default_database_type => "ASN" } } } filter { if ! [destination][geo] { geoip { source => "[destination][ip]" target => "[destination][geo]" fields => ["city_name" , "country_name" , "country_code2" , "region_name" , "region_code" , "location" ] database => "/etc/logstash/GeoLite2-City.mmdb" } geoip { source => "[destination][ip]" target => "[destination][as]" fields => ["autonomous_system_organization" , "autonomous_system_number" ] database => "/etc/logstash/GeoLite2-ASN.mmdb" default_database_type => "ASN" } } } filter { mutate { rename => ["[source][geo][country_code2]" , "[source][geo][country_iso_code]" ] rename => ["[source][geo][region_code]" , "[source][geo][region_iso_code]" ] rename => ["[source][as][asn]" , "[source][as][number]" ] rename => ["[source][as][as_org]" , "[source][as][organization.name]" ] rename => ["[destination][geo][country_code2]" , "[destination][geo][country_iso_code]" ] rename => ["[destination][geo][region_code]" , "[destination][geo][region_iso_code]" ] rename => ["[destination][as][asn]" , "[destination][as][number]" ] rename => ["[destination][as][as_org]" , "[destination][as][organization.name]" ] remove_tag => [ "_geoip_lookup_failure" ] } }
2.2 enrichment-alarm_from_siem 针对alarm事件进行丰富化,也就是SIEM发出的数据。上图中红色线所示部分
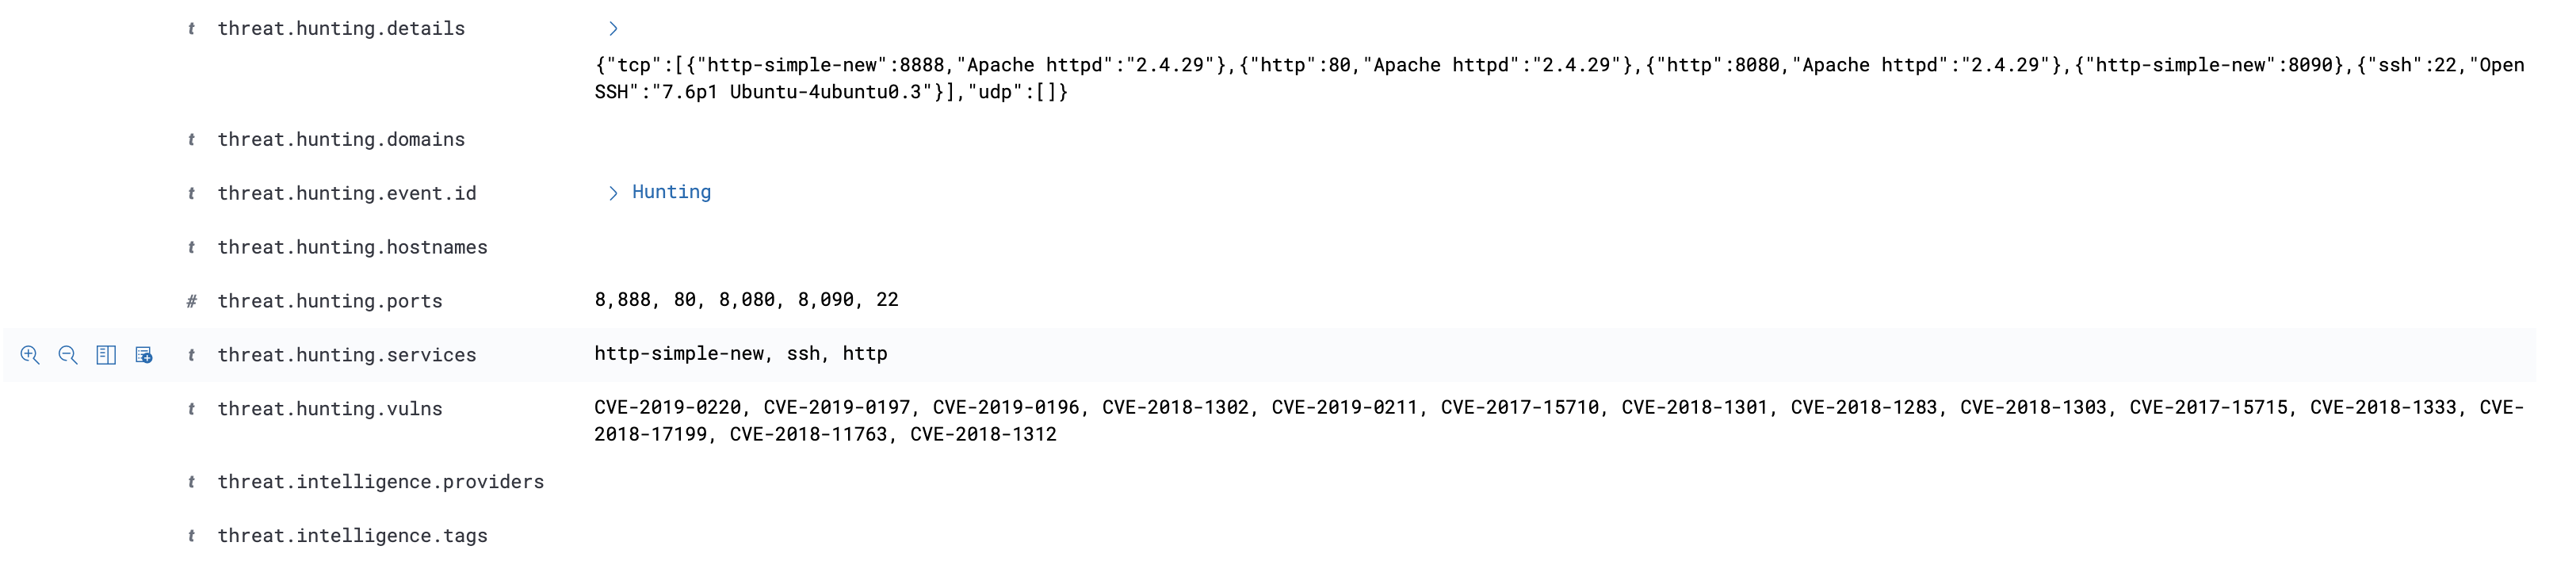
为SIEM告警增加了Hunting 的功能,通过该功能可直接溯源到触发alarm的所有alert事件。
Logstash Config 1 2 3 4 5 6 7 filter { if [event][kind] == "alarm" and [related][event][log ] { ruby { path => "/etc/logstash/scripts/add_related_event_id.rb" } } }
Ruby Code 1 2 3 4 5 6 7 8 9 10 11 12 13 14 15 16 17 18 19 20 21 22 23 24 25 26 27 28 29 30 require "json" def register (params) @pattern = /(?:\\n)?\w+ \d+ \d+:\d+:\d+ logstash NORMALIZED\[-\]: / end def filter (event) event_id = [] rule_id = [] rule_name = [] event_log = event.get('[related][event][log]' ) atomic_rules = event_log.split(@pattern )[1 .. -1 ] for atomic in atomic_rules do e_id = JSON.parse(atomic)['event' ]['id' ] r_id = JSON.parse(atomic)['rule' ]['id' ] r_name = JSON.parse(atomic)['rule' ]['name' ] event_id.push(e_id) rule_id.push(r_id) rule_name.push(r_name) end event.set('[related][event][id]' , event_id) event.set('[related][rule][id]' , rule_id) event.set('[related][rule][name]' , rule_name) event.remove('[related][event][log]' ) return [event] end
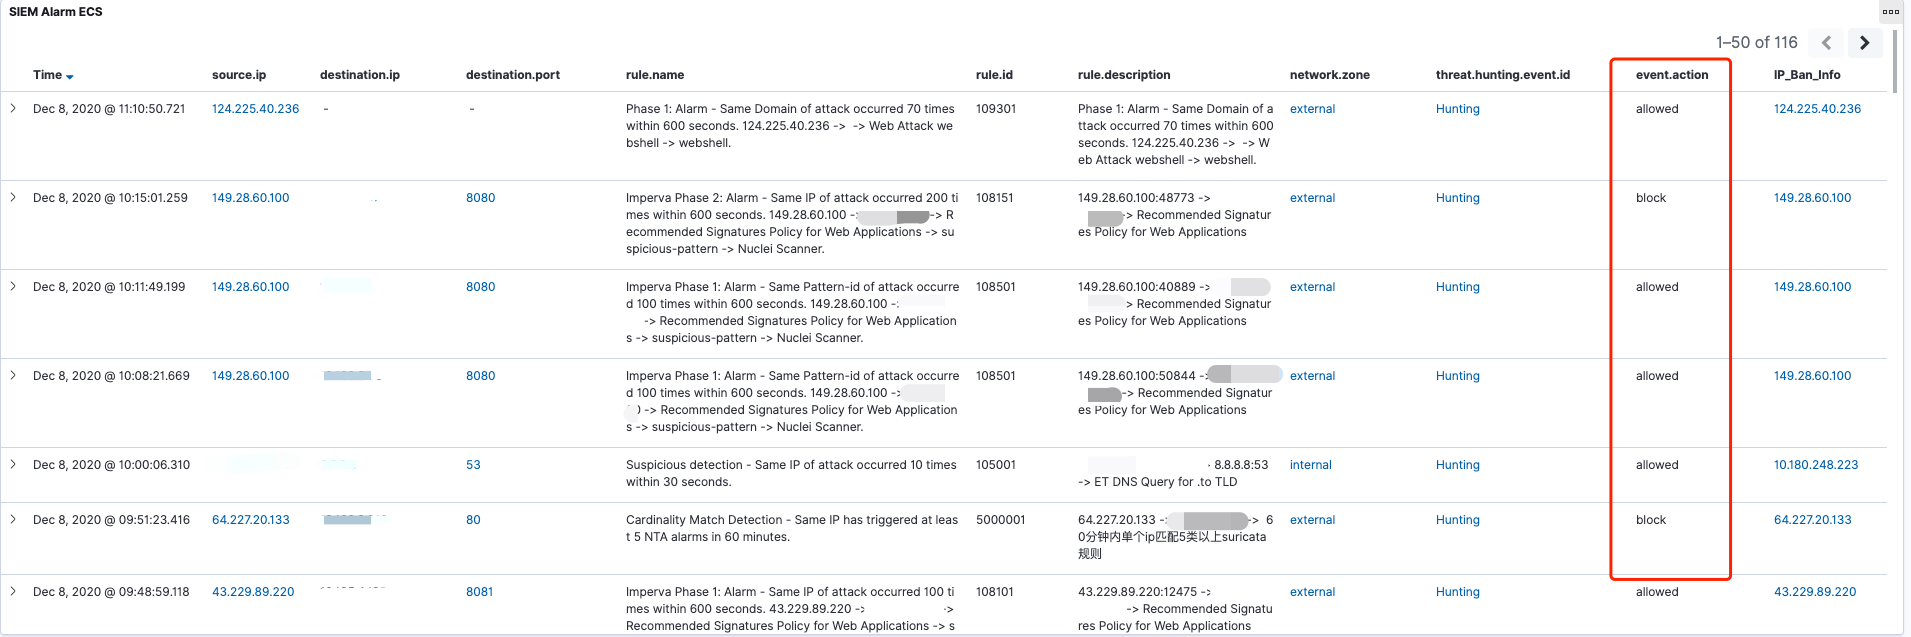
示例 以下是一个Wazuh聚合告警,分析人员通过点击threat.hunting.event.id字段即可溯源出触发该聚合规则的底层alert事件。
3. Threat Intelligence
3.1 threatIntel_alert_to_siem 通过Logstash加载Ruby脚本,将IoC推送至Redis。为了避免重复推送,每个IoC都会设置超时时间(默认7天)。如上图中蓝色线所示部分;
3.1.1 add-ti_shodan 对于攻击过我们的IP地址我们都会利用Shodan 进行反向探测,收集一波攻击者(肉鸡)的资产信息,留给后面分析人员用。由于已经设置了IoC超时时间,所以在超时之前IoC不会重复推送。当然,单个Key调用API频率还是要控制一下的,不过你可以选择多个Key哦。你懂的 😈😈😈
Logstash Config 1 2 3 4 5 6 7 8 9 10 11 12 13 14 15 16 17 18 19 20 21 22 23 24 25 26 27 filter { if [suricata][eve][alert] { clone { clones => [ "siem_events" ] } } } filter { if [type ] == "siem_events" { ruby { path => "/etc/logstash/scripts/siem-ti_shodan.rb" script_params => { "host" => "127.0.0.1" "port" => 6379 "password" => "HelloWorld" "ti_db" => 1 "alert_prefix" => "alert:" "expire" => 86400 "spider_db" => 5 "spider_key" => "spider:shodan:ioc" } } } }
Ruby Code 1 2 3 4 5 6 7 8 9 10 11 12 13 14 15 16 17 18 19 20 21 22 23 24 25 26 27 28 29 30 31 32 33 34 35 36 37 38 39 40 41 42 43 44 45 require "json" require "redis" require "ipaddr" def register (params) @expire = params["expire" ] @alert = params["alert_prefix" ] @alarm = params["alarm_prefix" ] @spider_key = params["spider_key" ] @ti_redis = Redis.new(host: params["host" ], port: params["port" ], password: params["password" ], db: params["ti_db" ]) @spider_redis = Redis.new(host: params["host" ], port: params["port" ], password: params["password" ], db: params["spider_db" ]) end def filter (event) src_ip = event.get("[source][ip]" ) dst_ip = event.get("[destination][ip]" ) begin ipaddr_src = IPAddr.new src_ip ipaddr_dst = IPAddr.new dst_ip rescue Exception => e event.cancel return [] end if not ipaddr_src.private?() then ioc = src_ip elsif not ipaddr_dst.private?() then ioc = dst_ip else return [event] end if event.get("[event][kind]" ) == "alert" then alert_ioc = @alert + ioc if not @ti_redis .exists?(alert_ioc) then @ti_redis .setex(alert_ioc, @expire , true ) @spider_redis .lpush(@spider_key , ioc) end end return [event] end
3.2 threatIntel_alarm_from_siem 通过Logstash进行威胁情报数据的丰富化。如上图中红色线所示部分;
将Shodan IoC情报数据丰富化至alarm。
Logstash Config 1 2 3 4 5 6 7 8 9 10 11 12 13 14 filter { if [event][kind] == "alarm" { ruby { path => "/etc/logstash/scripts/ti_shodan.rb" script_params => { "host" => "127.0.0.1" "port" => 6379 "password" => "HelloWorld" "ti_db" => 1 "alarm_prefix" => "alarm:" } } } }
Ruby Code 1 2 3 4 5 6 7 8 9 10 11 12 13 14 15 16 17 18 19 20 21 22 23 24 25 26 27 28 29 30 31 32 33 34 35 36 37 38 39 40 41 42 43 44 45 46 47 48 require "json" require "redis" require "ipaddr" def register (params) @alarm = params["alarm_prefix" ] @ti_redis = Redis.new(host: params["host" ], port: params["port" ], password: params["password" ], db: params["ti_db" ]) end def filter (event) src_ip = event.get("[source][ip]" ) dst_ip = event.get("[destination][ip]" ) begin ipaddr_src = IPAddr.new src_ip ipaddr_dst = IPAddr.new dst_ip rescue Exception => e event.cancel return [] end if not ipaddr_src.private?() then ioc = src_ip elsif not ipaddr_dst.private?() then ioc = dst_ip else return [event] end raw_data = @ti_redis .get(@alarm + ioc) if raw_data then data = JSON.parse(raw_data) if data then event.set("[threat][hunting][services]" , data["services" ]) event.set("[threat][hunting][vulns]" , data["vulns" ]) event.set("[threat][hunting][ports]" , data["ports" ]) event.set("[threat][hunting][hostnames]" , data["hostnames" ]) event.set("[threat][hunting][domains]" , data["domains" ]) if data["details" ] then details = data["details" ].to_json event.set("[threat][hunting][details]" , details) end end end return [event] end
示例 1 2 3 4 5 6 7 8 9 10 11 12 13 14 15 16 17 18 19 20 21 22 23 24 25 26 27 28 29 30 31 32 33 34 35 36 37 { "threat" : { "hunting" : { "vulns" : [ "CVE-2019-0220" , "CVE-2019-0197" , "CVE-2019-0196" , "CVE-2018-1302" , "CVE-2019-0211" , "CVE-2017-15710" , "CVE-2018-1301" , "CVE-2018-1283" , "CVE-2018-1303" , "CVE-2017-15715" , "CVE-2018-1333" , "CVE-2018-17199" , "CVE-2018-11763" , "CVE-2018-1312" ], "domains" : [], "ports" : [ 8888 , 80 , 8080 , 8090 , 22 ], "details" : "{\"tcp\":[{\"http-simple-new\":8888,\"Apache httpd\":\"2.4.29\"},{\"http\":80,\"Apache httpd\":\"2.4.29\"},{\"http\":8080,\"Apache httpd\":\"2.4.29\"},{\"http-simple-new\":8090},{\"ssh\":22,\"OpenSSH\":\"7.6p1 Ubuntu-4ubuntu0.3\"}],\"udp\":[]}" , "hostnames" : [], "services" : [ "http-simple-new" , "ssh" , "http" ] } } }
这部分通常是对接的自有情报(我们会收集攻击过我们的IP,建立适用于自己的内部情报。 )以及开源情报。原则上SIEM产生的alarm事件并不会很多,所以这边直接从Elastic获取了情报数据进行告警的丰富化。如果alarm事件很多的话,建议也是放在Redis或者再考虑其他方案。近期准备采购商业情报,后期将会有一个商业情报的对接过程。
Logstash Config 1 2 3 4 5 6 7 8 9 10 11 12 filter { if [event][kind] == "alarm" { ruby { path => "/etc/logstash/scripts/siem-ti_tags.rb" script_params => { "index" => "ecs-ti-*" "urls" => "https://elastic:HelloWorld@127.0.0.1:9200" "ca" => "ca.crt" } } } }
Ruby Code 1 2 3 4 5 6 7 8 9 10 11 12 13 14 15 16 17 18 19 20 21 22 23 24 25 26 27 28 29 30 31 32 33 34 35 36 37 38 39 40 41 42 43 44 45 46 47 48 49 50 51 52 53 54 55 56 57 58 59 60 61 62 63 64 65 66 67 require 'json' require 'elasticsearch' def register (params) @urls = params["urls" ] @index = params["index" ] @ca = params["ca" ] @client = Elasticsearch::Client.new urls: @urls , transport_options: { ssl: { ca_file: @ca } } end def filter (event) ioc = event.get('[source][ip]' ) query = { "_source" : { "includes" : [ "threat.tags" , "threat.provider" ] }, "query" : { "bool" : { "must" : [ { "terms" : { "threat.type" : [ "ipv4" , "ip" ] } }, { "term" : { "threat.ioc" : ioc } } ], "filter" : [ { "range" : { "threat.creation_time" : { "gte" : "now-7d" } } } ] } }, "size" : 10 } response = @client .search index: @index , body: query.to_json tags = [] providers = [] if not response['hits' ]['hits' ].empty? then response['hits' ]['hits' ].each do |result| if not providers.include ?(result["_source" ]["threat" ]["provider" ]) providers.push(result["_source" ]["threat" ]["provider" ]) end tags = tags - result["_source" ]["threat" ]["tags" ] tags = tags + result["_source" ]["threat" ]["tags" ] end end event.set('[threat][intelligence][tags]' , tags) event.set('[threat][intelligence][providers]' , providers) return [event] end
示例
1 2 3 4 5 6 7 8 9 10 11 12 { "threat" : { "intelligence" : { "providers" : [ "NTA" ], "tags" : [ "WebAttack" ] } } }
4. Filter
4.1 alert_to_siem 4.1.1 filter_ip_from_alert 实际使用场景中需要对一些白名单IP、特定签名规则进行过滤。这么做也是为了保证SIEM的性能以及告警的可靠性。这部分数据依旧会发送到Elastic作为历史数据留存,但不会被SIEM消费并产生告警。
Logstash Config 利用Clone 插件,将需要被SIEM消费的数据经由脚本过滤。
1 2 3 4 5 6 7 8 9 10 11 12 13 14 15 16 17 18 19 20 21 22 filter { if [suricata][eve][alert] { clone { clones => [ "siem_events" ] } } } filter { if [type ] == "siem_events" { ruby { path => "/etc/logstash/scripts/siem-filter_ip.rb" script_params => { "host" => "127.0.0.1" "port" => 6379 "password" => "HelloWorld" "cdn_db" => 3 "scan_db" => 4 } } } }
Ruby Code 1 2 3 4 5 6 7 8 9 10 11 12 13 14 15 16 17 18 19 20 21 22 23 require "redis" def register (params) begin @cdn_db = Redis.new(host: params["host" ], port: params["port" ], password: params["password" ], db: params["cdn_db" ]) @scan_db = Redis.new(host: params["host" ], port: params["port" ], password: params["password" ], db: params["scan_db" ]) rescue return end end def filter (event) src_ip = event.get("[source][ip]" ) dst_ip = event.get("[destination][ip]" ) if @cdn_db .exists?(src_ip) || @cdn_db .exists?(dst_ip) || @scan_db .exists?(src_ip) || @scan_db .exists?(dst_ip) then event.cancel return [] end return [event] end
4.1.2 filter_sid_from_alert Logstash Config 1 2 3 4 5 6 7 8 9 10 11 12 13 14 15 16 17 18 19 20 21 filter { if [suricata][eve][alert] { clone { clones => [ "siem_events" ] } } } filter { if [type ] == "siem_events" { ruby { path => "/etc/logstash/scripts/siem-filter_sid.rb" script_params => { "host" => "127.0.0.1" "port" => 6379 "password" => "HelloWorld" "sid_db" => 2 } } } }
Ruby Code 1 2 3 4 5 6 7 8 9 10 11 12 13 14 15 require "redis" def register (params) @signature_id = Redis.new(host: params["host" ], port: params["port" ], password: params["password" ], db: params["sid_db" ]) end def filter (event) sid = event.get("[rule][id]" ) if @signature_id .exists?(sid) then event.cancel return [] end return [event] end
4.2 alarm_from_siem 4.2.1 update_action_from_alarm 更新匹配到的rule.id事件,将event.action值更新为:block。便于后期被SIEM联动模块“消费”。如上图中红色线所示部分。主要是为了通过event.action字段来区分SIEM做的自动化操作。
Logstash Config 针对指定rule.id事件,将allowed值更新为:block。便于后期被联动模块“消费”。
1 2 3 4 5 6 7 8 9 10 11 12 13 14 15 16 17 filter { mutate { update => { "[event][action]" => "allowed" } } ruby { path => "/etc/logstash/scripts/siem-update_action.rb" script_params => { "host" => "127.0.0.1" "port" => 6379 "password" => "HelloWorld" "siem_action_db" => 7 } } }
Ruby Code 1 2 3 4 5 6 7 8 9 10 11 12 13 14 15 16 17 18 19 20 21 require "redis" def register (params) begin @siem_action_db = Redis.new(host: params["host" ], port: params["port" ], password: params["password" ], db: params["siem_action_db" ]) rescue return end end def filter (event) rule_id = event.get("[rule][id]" ) if @siem_action_db .exists?(rule_id) then event.set("[event][action]" , "block" ) end return [event] end
示例:
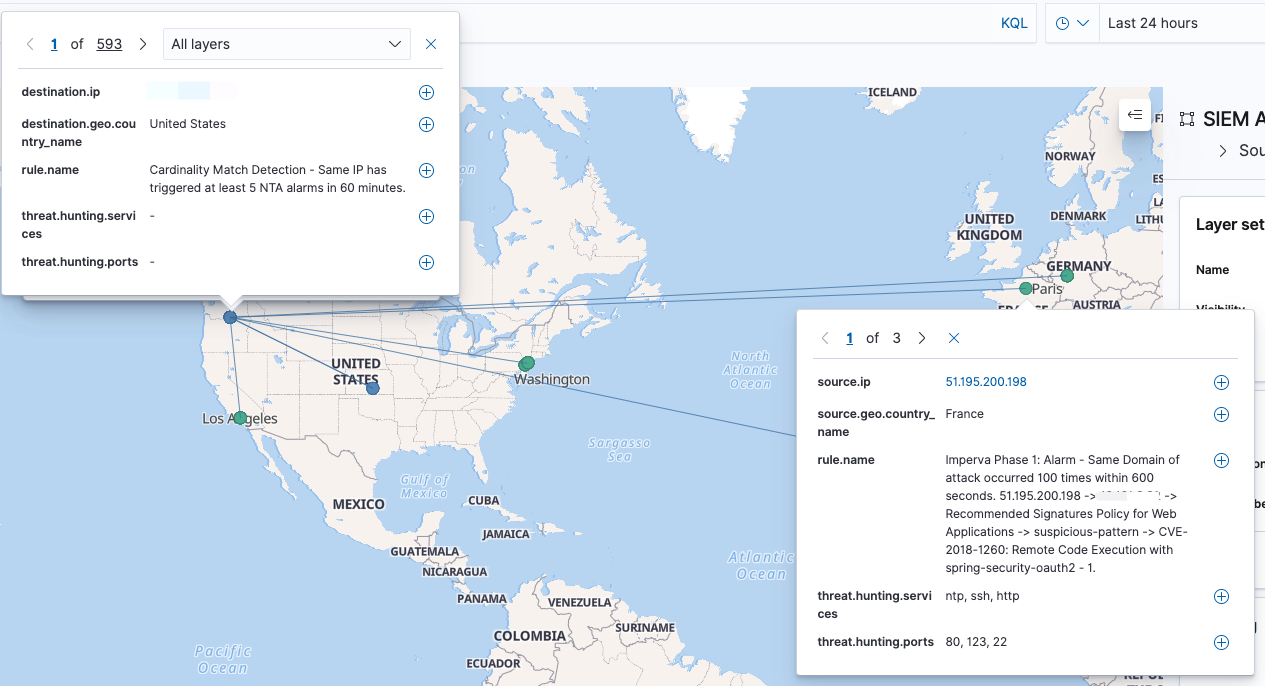
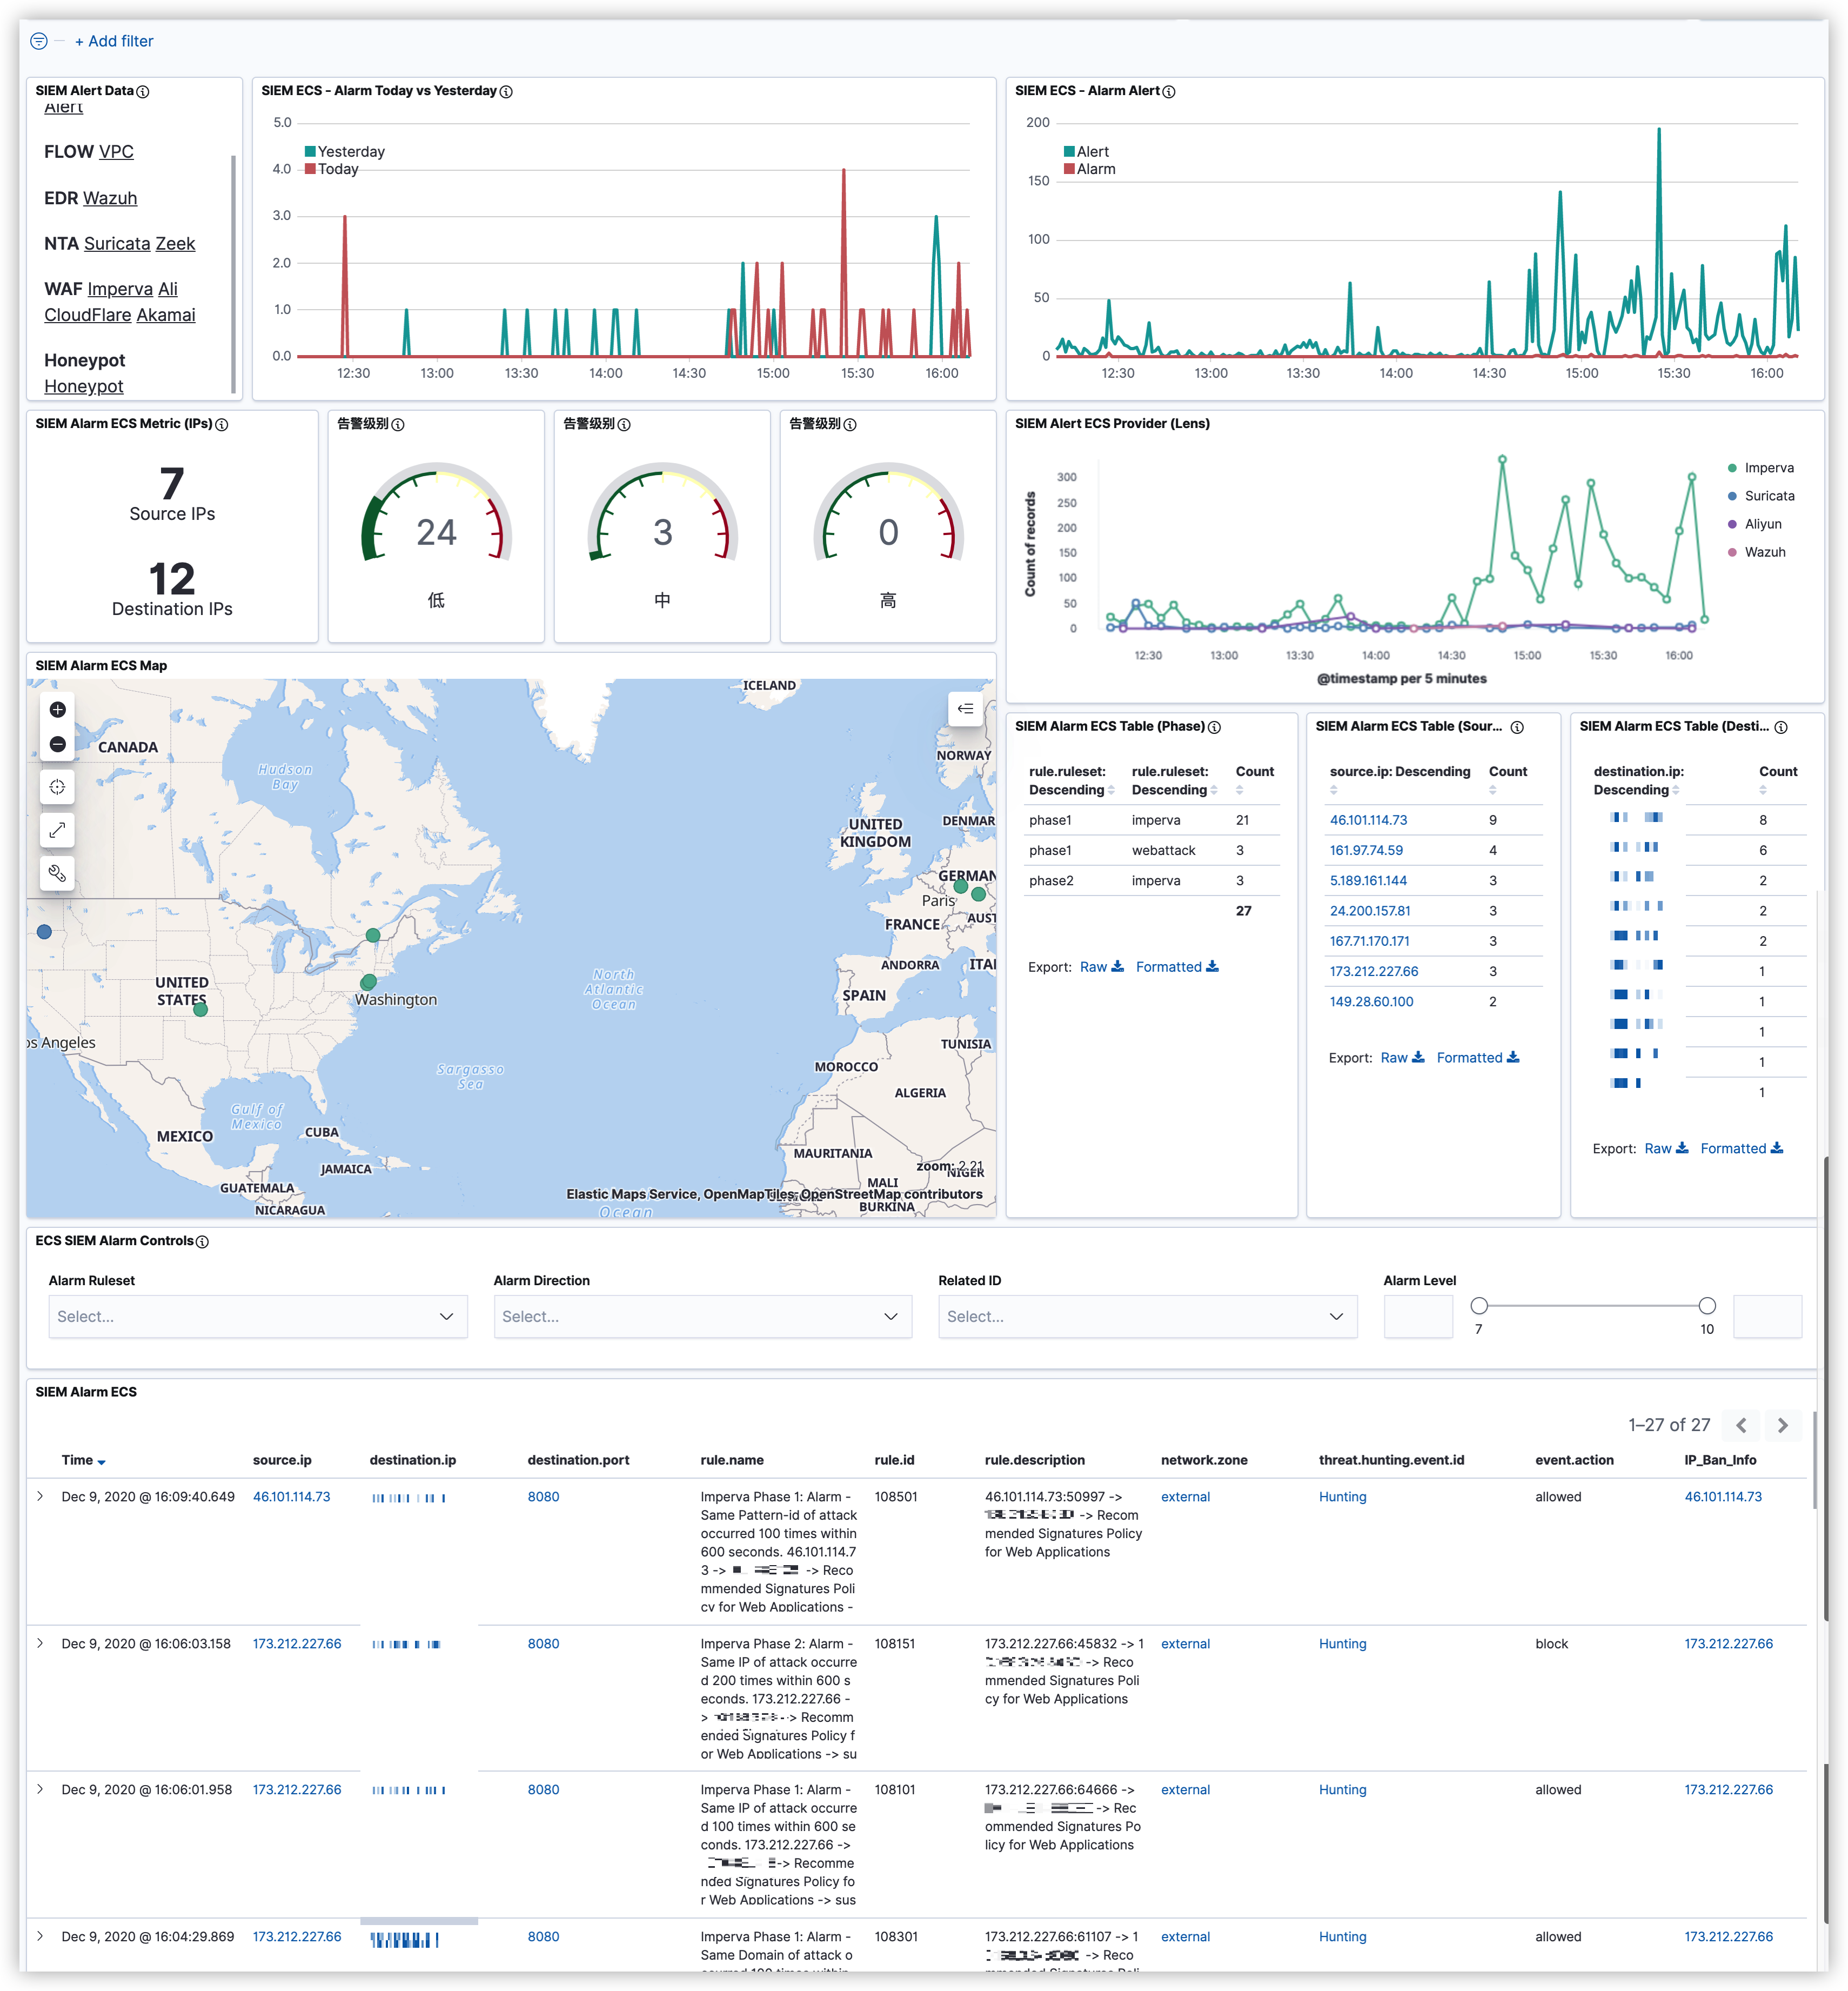
3. 仪表盘 SIEM的告警仪表盘
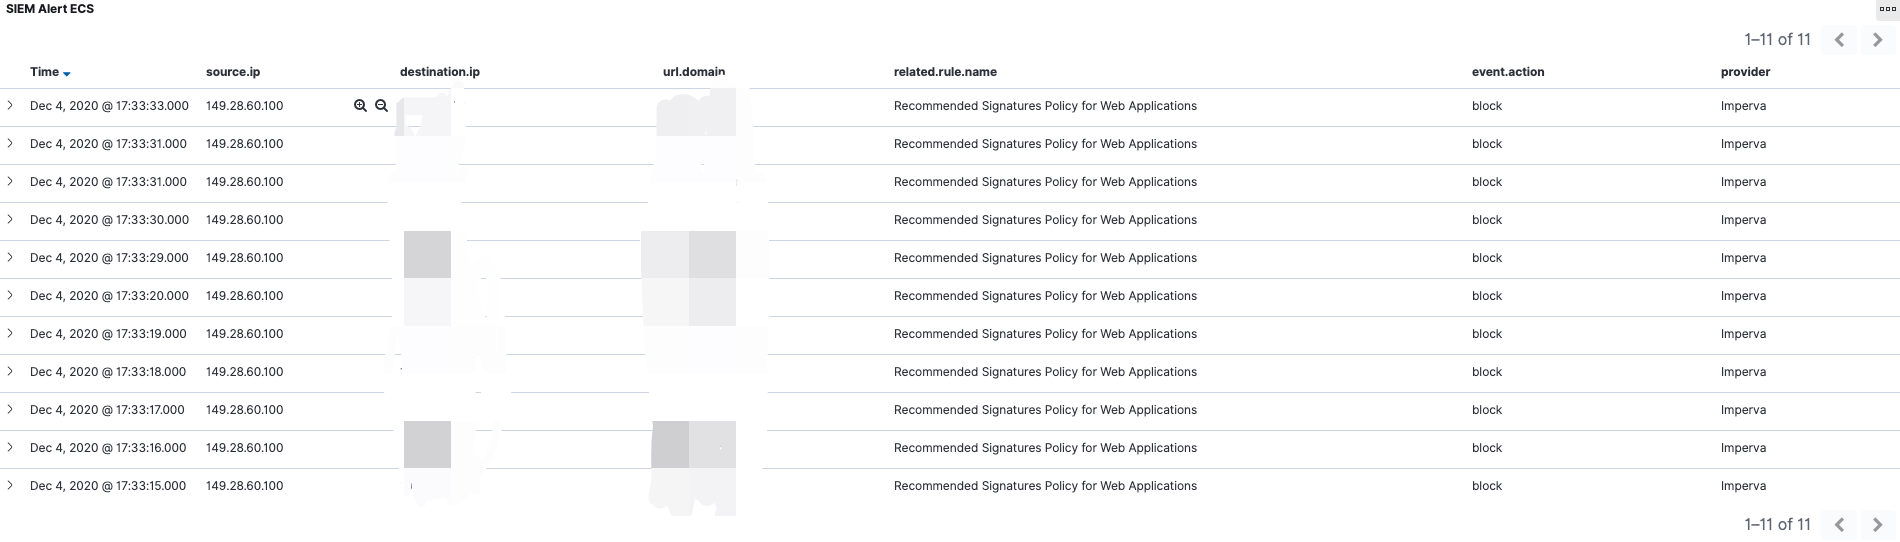
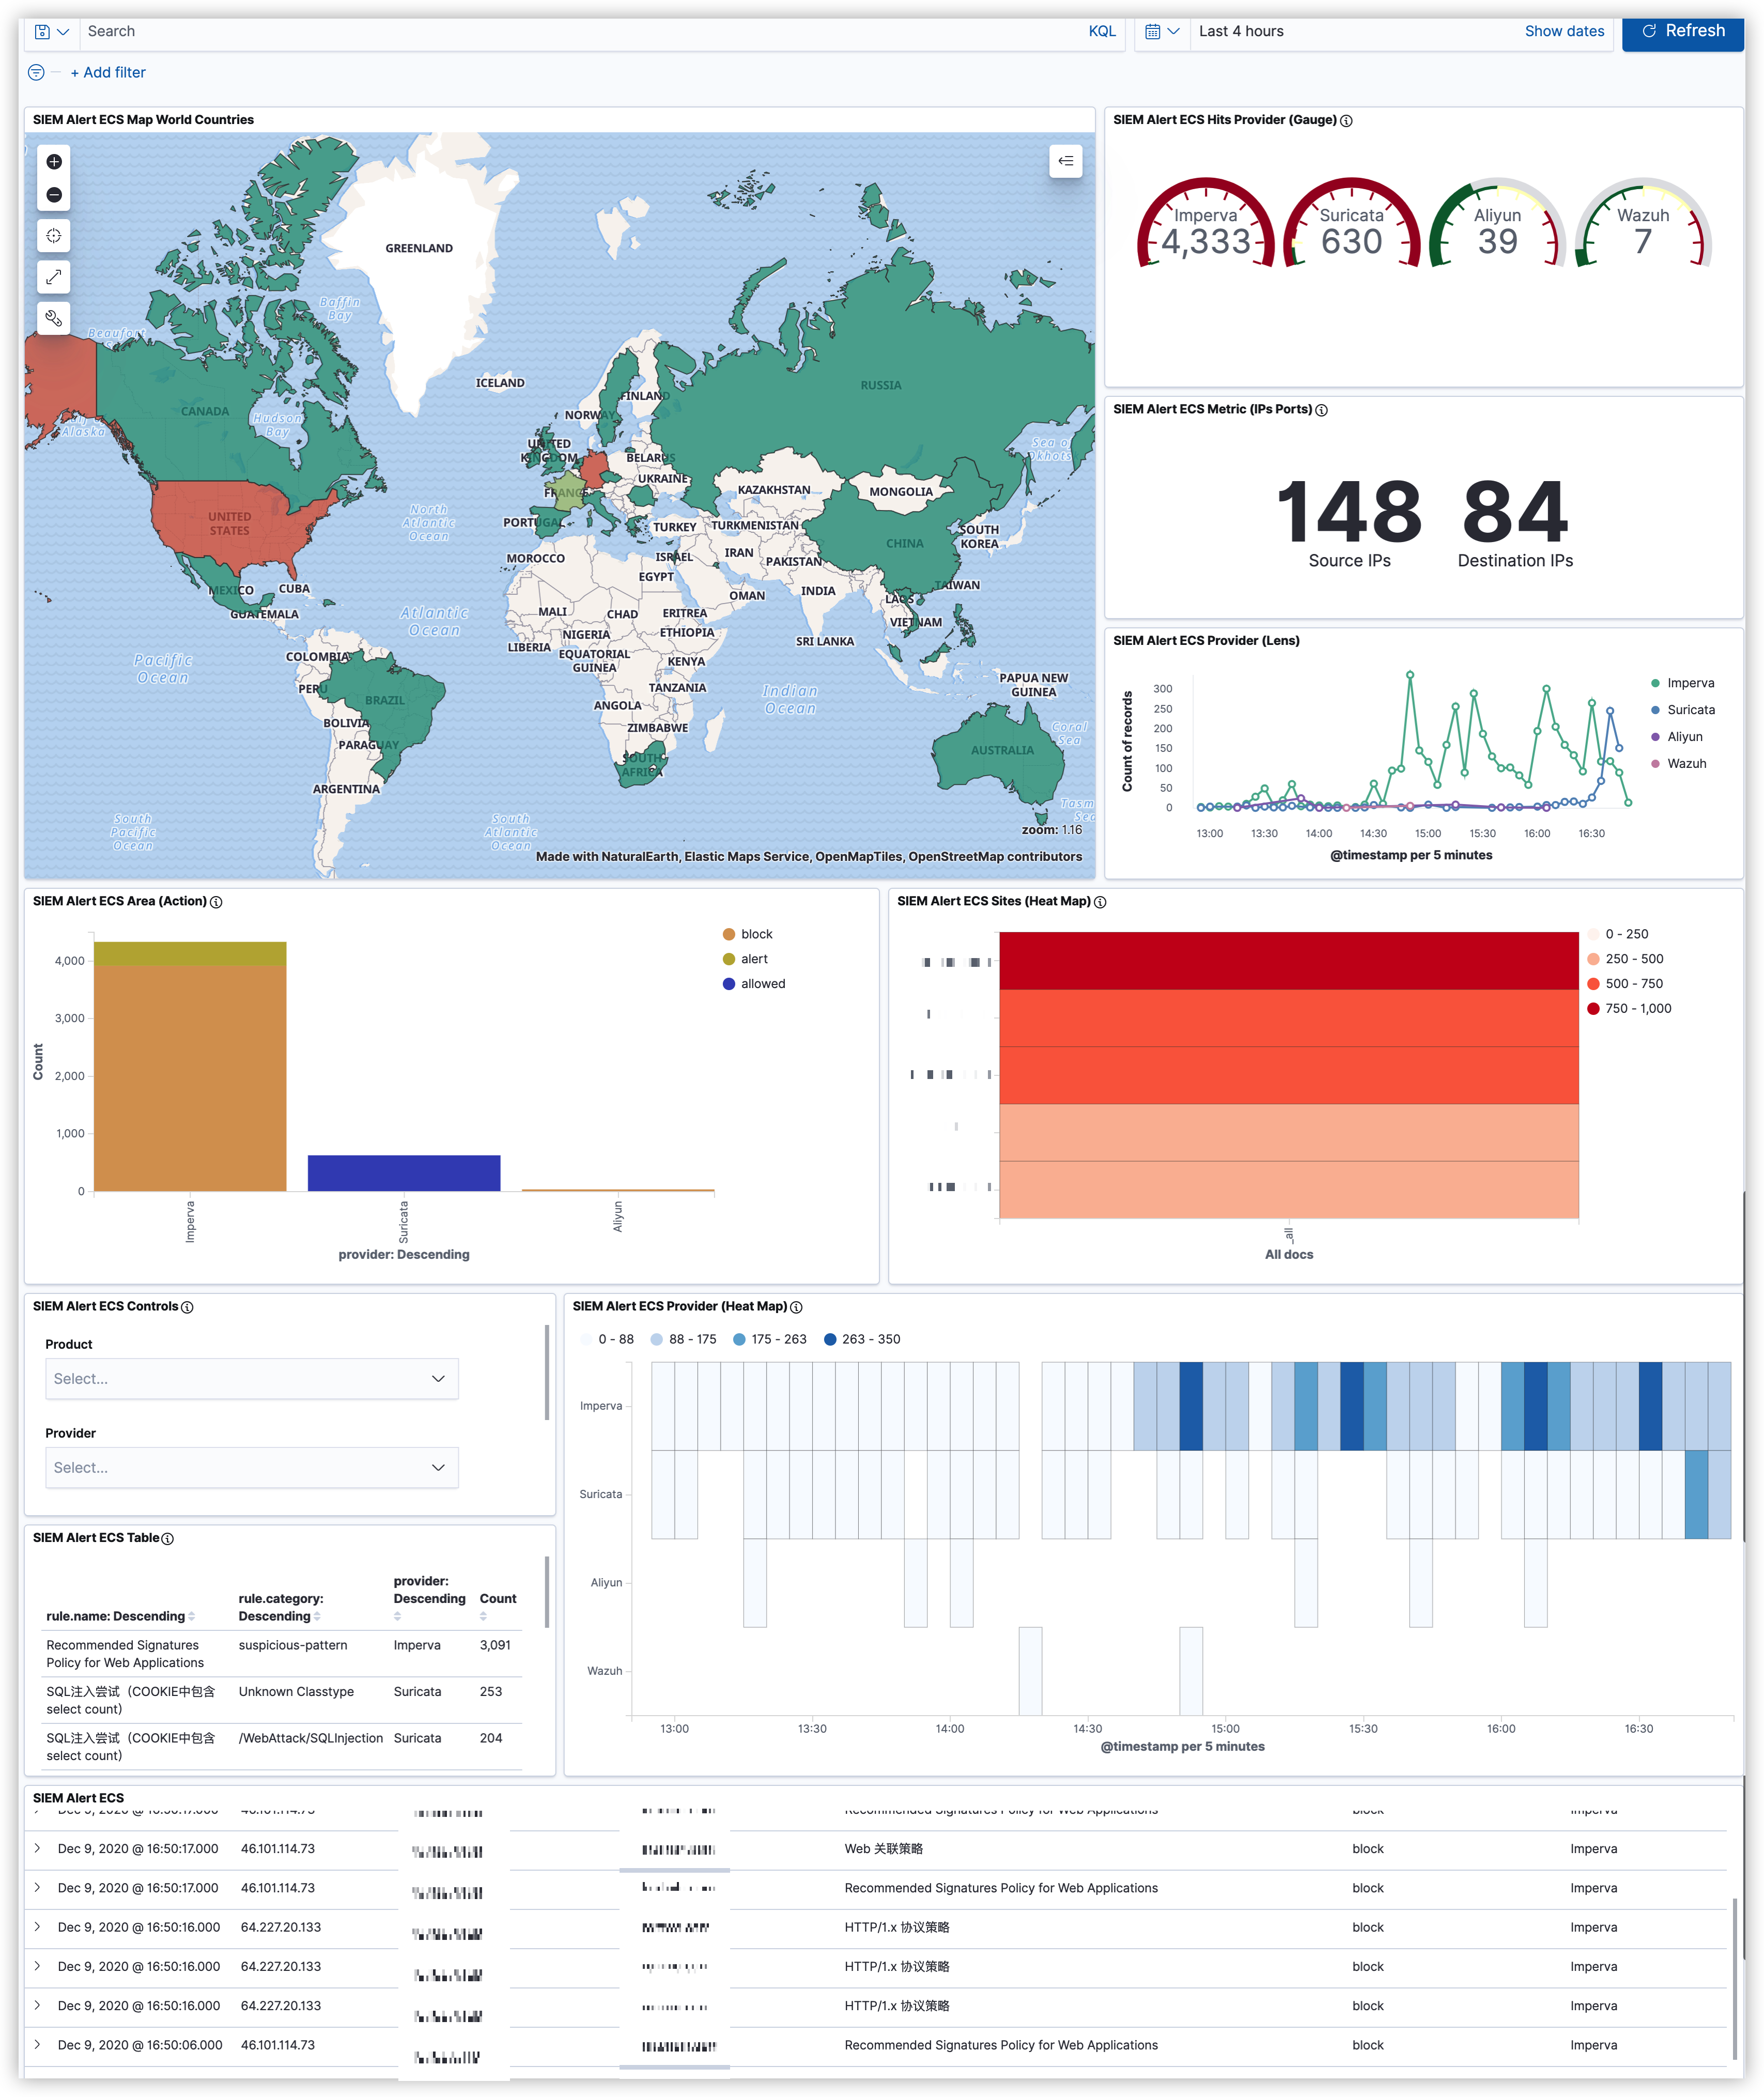
安全事件仪表盘 (安全溯源)
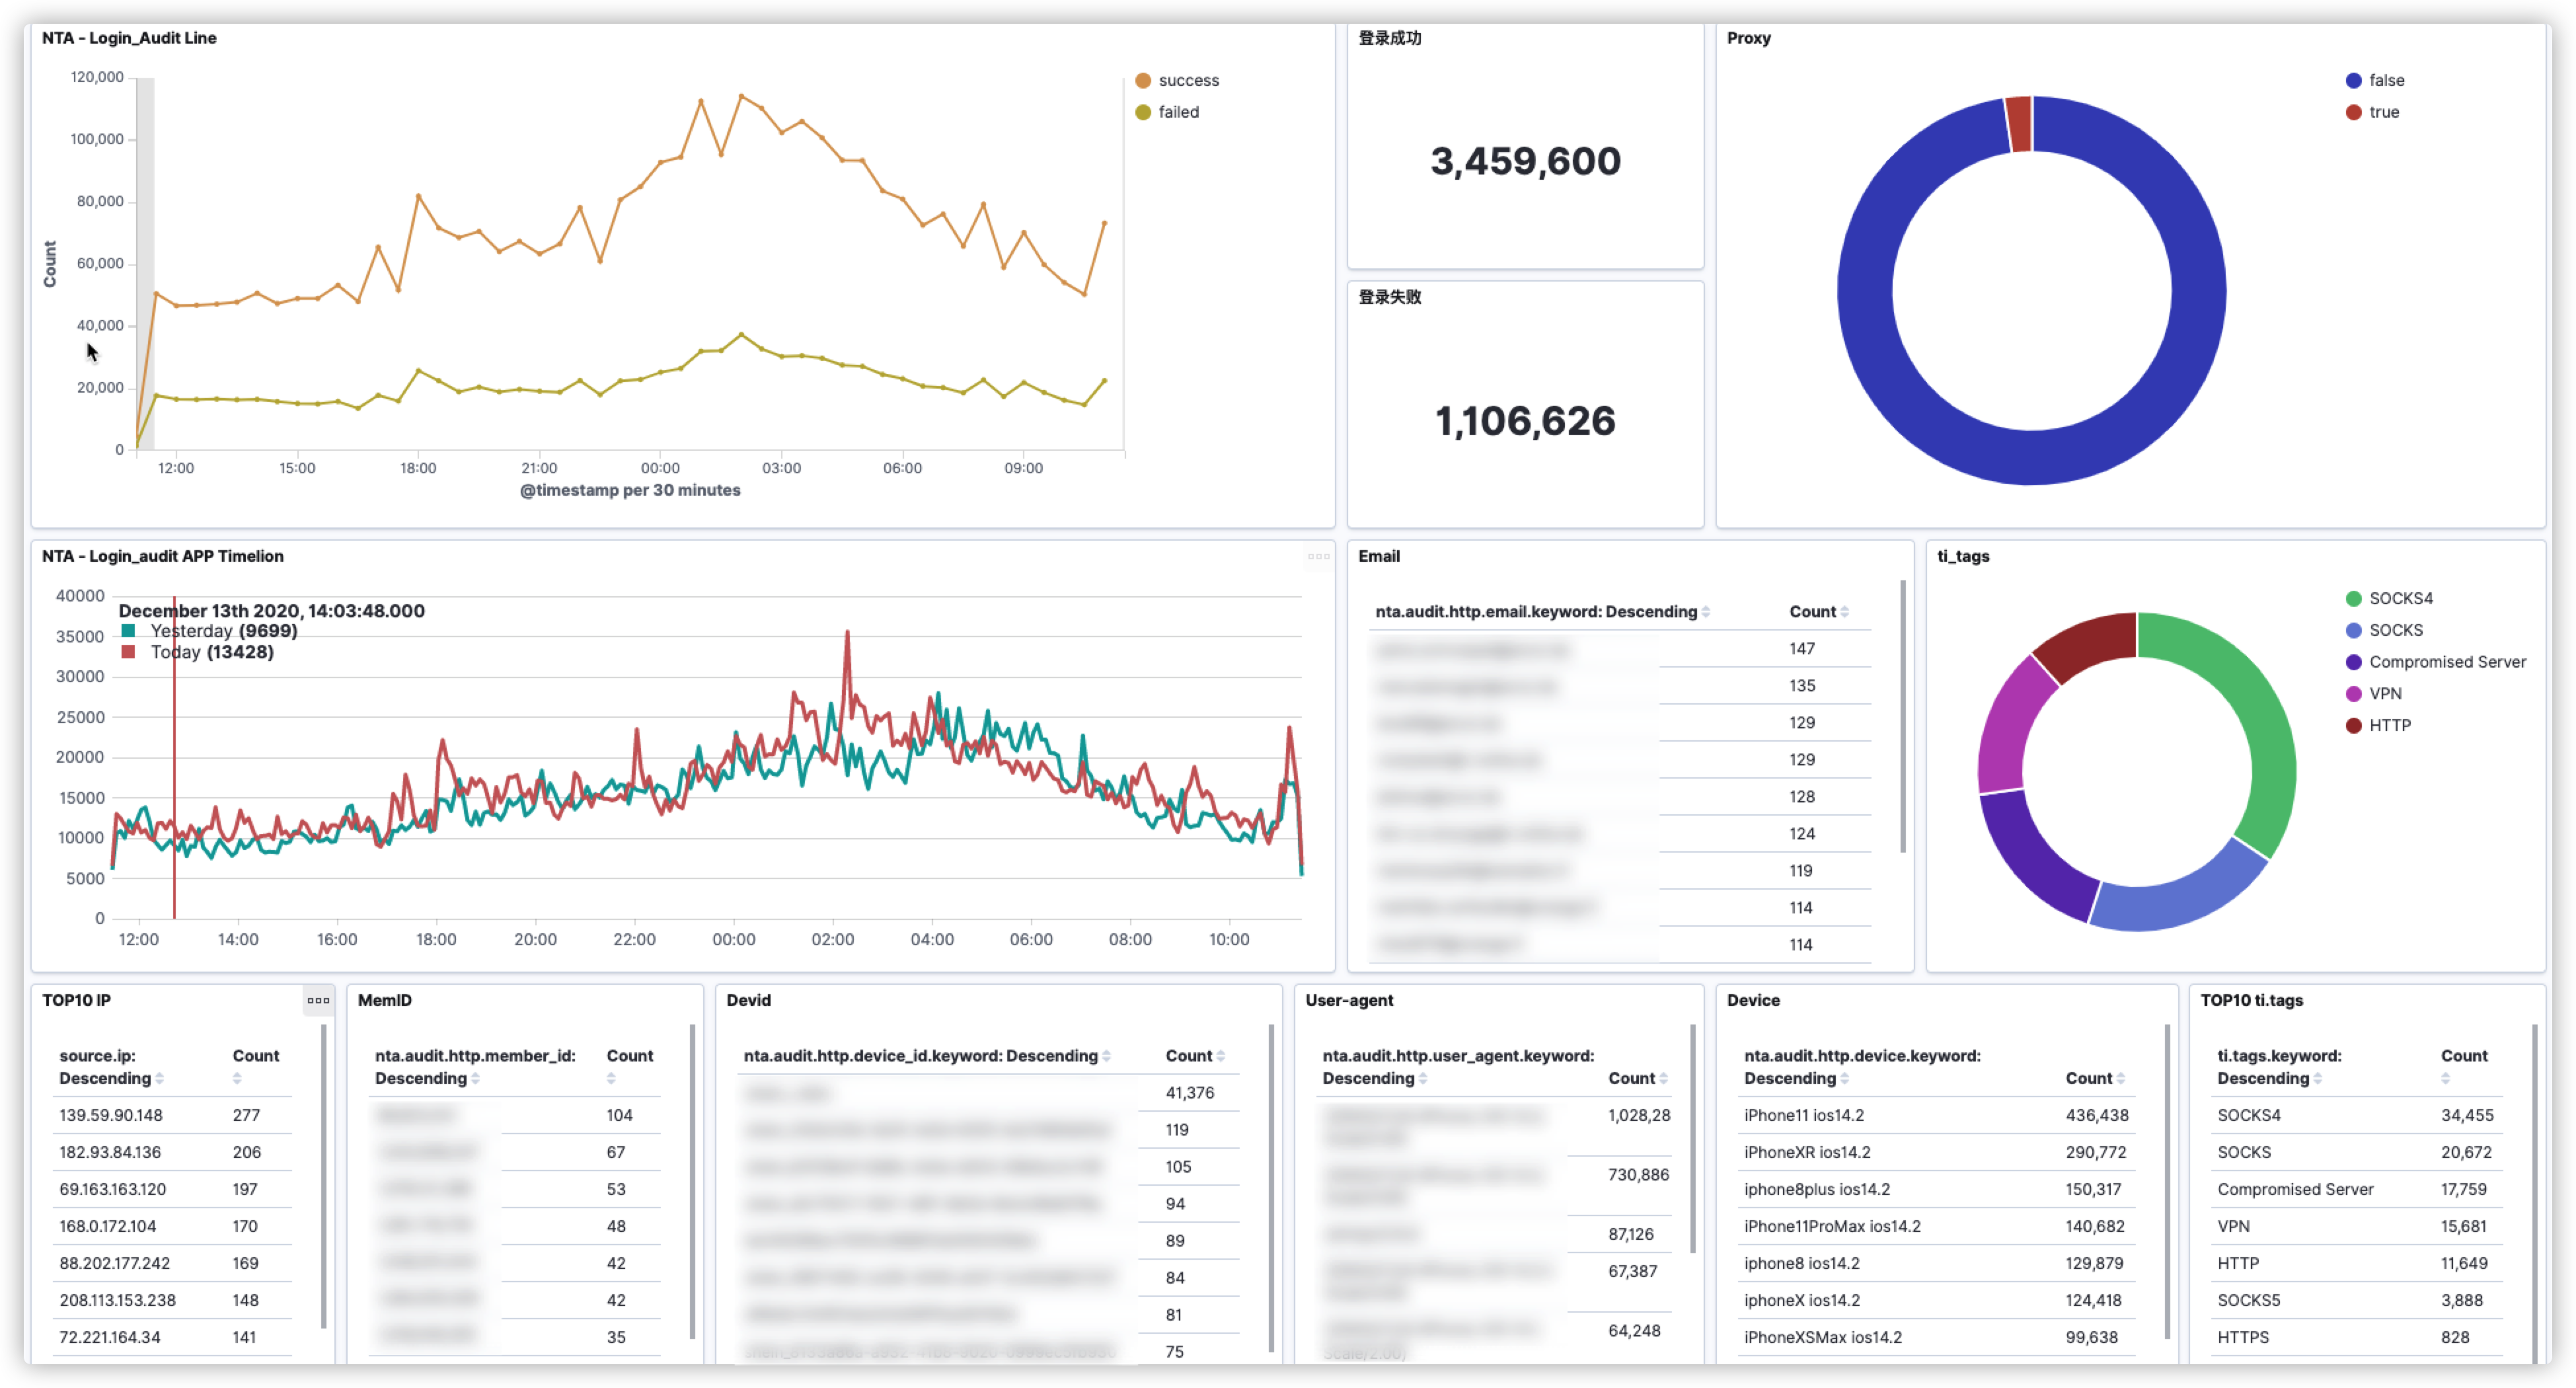
敏感接口监控