0%

背景

​ 由于项目需要, 用到了Ruby对Logstash进行一些定制化的配置。翻遍了整个Logstash的官方文档, 对于Ruby API的介绍就写了两个方法。getset 也是醉了😂, 幸好谷歌一下…

解决方案

  • 删除事件:cancel
  • 取消删除事件:uncancel
  • 是否删除:cancelled?
  • 是否包含字段:include?
  • 删除字段:remove
  • 事件转字符串:to_s
  • 事件转hash字典(不含metadata字段):to_hash
  • 事件转hash字典(含metadata字段):to_hash_with_metadata
  • 事件转json字符串:to_json
  • 增加tag:tag
  • 取事件时间戳:timestamp

更多查询官方接口源码: JrubyEventExtLibrary.java

参考

背景

当Logstash要处理的多个input类型时, 最常见的两种解决方案(不推荐):

  1. 通过条件判断解决问题

  2. 通过多实例解决问题

负面影响:

  1. 条件判断

    1. 条件地狱。已知的在一个管道中实现多个独立流的方法是使用条件判断。主要方式是在输入部分通过标签标记事件,然后在过滤器中和输出阶段创建条件分支,对贴有不同标签的事件,应用不同的插件集。这种方式虽然可以解决问题,但在实际的使用中却非常的痛苦!下面是一个简单的 demo 片段:
    1
    2
    3
    4
    5
    6
    7
    8
    9
    10
    11
    12
    13
    14
    15
    16
    17
    18
    19
    20
    21
    22
    23
    24
    25
    26
    input {
    beats {
    port => 3444
    tag => apache
    }
    tcp {
    port => 4222
    tag => firewall
    }
    }

    filter {
    if "apache" in [tags] {
    dissect { ... }
    } else if "firewall" in [tags] {
    grok { ... }
    }
    }

    output {
    if "apache" in [tags] {
    elasticsearch { ... }
    } else if "firewall" in [tags] {
    tcp { ... }
    }
    }
    1. 缺乏拥塞管理。Logstash在所有事件和完成所有输出之前不会移动到下一批事件。这意味着,对于上面的管道,如果 TCP 套接字目标不可达,Logstash将不会处理其他批次的事件,这也就意味着 Elasticsearch 将不会接收事件,并且会对 TCP 输入和 Beats 输入施加反压力。
    2. 不同的数据流需要以不同的方式处理。如果 TCP - > Grok - > TCP 数据流处理大量的小数据,而 Beats -> Dissect -> ES 数据流中的单个数据体积大但是数量少。那么前一个数据流希望有多个 worker 并行并其每一批次处理更多事件,第二个数据流则期望使用少量的 worker 和每批次处理少量的事件。使用单个管道,无法为单个数据流指定独立的管道配置。
  2. 多实例

    1. 需要管理多个实例(通过 init 系统管理多个后台服务)
    2. 每个 Logstash 的实例也意味着一个独立的 JVM
    3. 需要监视每个 Logstash 实例

解决方案

​ 通过配置多管道(Multiple Pipelines), 解决以上的所有问题。

配置

/usr/share/logstash/config/pipelines.yml

1
2
3
4
5
6
7
8
9
10
11
12
13
14
15
16
17
18
19
20
21
# This file is where you define your pipelines. You can define multiple.
# For more information on multiple pipelines, see the documentation:
# https://www.elastic.co/guide/en/logstash/current/multiple-pipelines.html

- pipeline.id: dsiem
path.config: "/etc/logstash/conf.d_siem/*.conf"
pipeline.workers: 16
queue.type: persisted
queue.max_bytes: 300gb

- pipeline.id: cloudflare
path.config: "/etc/logstash/conf.d_cf/*.conf"
pipeline.workers: 8
queue.type: persisted
queue.max_bytes: 100gb

- pipeline.id: ti
path.config: "/etc/logstash/conf.d_ti/*.conf"
pipeline.workers: 8
queue.type: persisted
queue.max_bytes: 50gb

/etc/supervisord.d/logstash.ini

1
2
3
4
5
6
7
8
9
10
11
12
13
14
15
[program:logstash]
command=/usr/share/logstash/bin/logstash --path.data /lingtian/data/logstash/
#user=logstash
numprocs=1
autostart=true
autorestart=true
startsecs=1
startretries=3
exitcodes=0,2
stopsignal=INT
redirect_stderr=true
stdout_logfile_maxbytes=1MB
stdout_logfile_backups=5
stdout_capture_maxbytes=1MB
stdout_logfile=/lingtian/logs/logstash/logstash.log
加载配置文件

可通过使用参数, --config.reload.automatic or -r 在配置文件发生更改后自动检测并重新加载配置。

1
$ bin/logstash -f apache.config --config.reload.automatic

默认3秒检查配置文件, 可以通过使用参数, --config.reload.interval 修改秒数。

如果Logstash已经在没有启用自动重载的情况下运行,则可以通过向运行Logstash的进程发送SIGHUP(信号挂起)来强制Logstash重载配置文件并重新启动管道。例如:

1
$ kill -SIGHUP $logstash_pid

参考

背景

​ 在利用Scrapy编写爬虫时,经常会遇到同一个爬虫中包含多个item classes, 并且需要在同一个pipelines.py中根据不同的item classes进行逻辑的处理。

需求: 数据需要同时发送到ElasticSearch以及Redis, 唯一的区别就是item classes,不同。发送到Redis的数据是标准化之后的数据, 发送到ElasticSearch是原始的数据。

解决方法: 这里可以通过isinstance来进行区分。

实现

1
2
3
4
5
6
7
8
9
10
11
12
13
14
15
16
17
18
19
20
21
22
# -*- coding: utf-8 -*-

# Define your item pipelines here
#
# Don't forget to add your pipeline to the ITEM_PIPELINES setting
# See: https://doc.scrapy.org/en/latest/topics/item-pipeline.html


from tb.items import RedisItem
from tb.items import ElasticSearchItem

class RedisPipeline(object):
def process_item(self, item, spider):
if isinstance(item, RedisItem):
# to do something
return item

class ElasticPipeline(object):
def process_item(self, item, spider):
if isinstance(item, ElasticSearchItem):
# to do something
return item

参考

需求

​ 在自建企业内部威胁情报的过程中, 需要通过Redis统一管理过期时间的Key。因此需要对过期的Key进行实时监听, 并进行回调处理。

思路

​ 在 Redis2.8.0 版本之后,其推出了一个新的特性——键空间消息(Redis Keyspace Notifications),它配合 2.0.0 版本之后的 SUBSCRIBE 就能完成这个定时任务的操作了。

Redis 的键空间通知支持 订阅指定 Key 的所有事件 与 订阅指定事件 两种方式。

Keyspace notifications are implemented sending two distinct type of events for every operation affecting the Redis data space. For instance a DEL operation targeting the key named mykey in database 0 will trigger the delivering of two messages, exactly equivalent to the following two PUBLISH commands:

1
2
PUBLISH __keyspace@0__:mykey del
PUBLISH __keyevent@0__:del mykey

通过 Redis 的键空间通知(keyspace notification)可以做到:将IoC数据写入Redis,设置过期时间10分钟,利用 Redis 键过期回调提醒,如果未被消费,则进行处理。

实现

1. 修改 redis.conf 开启redis key过期提醒

By default keyspace events notifications are disabled because while not very sensible the feature uses some CPU power. Notifications are enabled using the notify-keyspace-events of redis.conf or via the CONFIG SET.

由于键空间通知比较耗CPU, 所以 Redis默认是关闭键空间事件通知的, 需要手动开启 notify-keyspace-events 后才启作用。

1
2
3
4
5
6
7
8
9
10
11
K:keyspace事件,事件以__keyspace@<db>__为前缀进行发布;        
E:keyevent事件,事件以__keyevent@<db>__为前缀进行发布;
g:一般性的,非特定类型的命令,比如del,expire,rename等;
$:String 特定命令;
l:List 特定命令;
s:Set 特定命令;
h:Hash 特定命令;
z:Sorted 特定命令;
x:过期事件,当某个键过期并删除时会产生该事件;
e:驱逐事件,当某个键因maxmemore策略而被删除时,产生该事件;
A:g$lshzxe的别名,因此”AKE”意味着所有事件。

notify-keyspace-events Ex 表示开启键过期事件提醒

redis.conf

1
2
3
4
5
6
7
8
9
10
11
12
13
14
15
16
17
18
19
20
# RDB Config
databases 16
save 900 1
save 300 10
save 60 10000
stop-writes-on-bgsave-error yes
rdbcompression yes
rdbchecksum no
dir ./
# AOF Config
appendonly yes
appendfilename "appendonly.aof"
appendfsync everysec
no-appendfsync-on-rewrite no
auto-aof-rewrite-percentage 100
auto-aof-rewrite-min-size 64mb
# set Password
requirepass %{mypassword}
# set notify-keyspace-events
notify-keyspace-events Ex

2. RedisHelper

1
2
3
4
5
6
7
8
9
10
11
12
13
14
15
16
17
18
19
20
21
22
23
24
25
26
27
28
#!/usr/bin/env python3
# Author: Canon
# Date: 2019-12-27
# Version: 0.2

import redis

class RedisHelper():
def __init__(self):
# 连接Redis
self.__conn = redis.Redis(host='127.0.0.1', port=6379, password='mypassword', db=0)
# 定义keyevent, 此处0为indexdb
self.keyevent = '__keyevent@0__:expired'

# 发布方法
def publish(self, key, msg):
ttl = 10
self.__conn.setex(key, msg, ttl)
return True

# 订阅方法
def subscribe(self):
sub = self.__conn.pubsub()
sub.subscribe(self.keyevent)
for msg in sub.listen():
if msg['type'] == 'message':
ex_key = msg['data'].decode()
print(ex_key)

参考

需求

​ 由于网站时常遭受黑客攻击, 现准备将手头一些攻击者的IP地址收集起来用做企业内部的威胁情报。既然要着手做威胁情报, 那么就避免不了通过一些网站进行数据的丰富化。要想简单省事儿, 当然是使用购买api账号的方式,不过有的api也很坑, 除非购买的是企业版, 否则个人版的api会受到请求速率的限制。所以这边只能依靠爬虫(Scrapy)来收集数据。但是采用了分布式爬虫, 就避免不了需要进行集中管理, 以及统一下等操作。下面就说下利用Scrapy官方提供的爬虫管理工具(Scrapyd)来满足以上的需求。

Scrapyd

Scrapyd是由Scrapy 官方提供的爬虫管理工具,使用它我们可以非常方便地上传、控制爬虫并且查看运行日志。

安装

1
$ pip install scrapyd

启动

1
2
3
4
5
6
7
8
9
$ scrapyd
2019-12-19T10:56:06+0800 [-] Loading /Users/canon/anaconda3/lib/python3.7/site-packages/scrapyd/txapp.py...
2019-12-19T10:56:06+0800 [-] Scrapyd web console available at http://127.0.0.1:6800/
2019-12-19T10:56:06+0800 [-] Loaded.
2019-12-19T10:56:06+0800 [twisted.scripts._twistd_unix.UnixAppLogger#info] twistd 18.9.0 (/Users/canon/anaconda3/bin/python 3.7.1) starting up.
2019-12-19T10:56:06+0800 [twisted.scripts._twistd_unix.UnixAppLogger#info] reactor class: twisted.internet.selectreactor.SelectReactor.
2019-12-19T10:56:06+0800 [-] Site starting on 6800
2019-12-19T10:56:06+0800 [twisted.web.server.Site#info] Starting factory <twisted.web.server.Site object at 0x109efcf98>
2019-12-19T10:56:06+0800 [Launcher] Scrapyd 1.2.1 started: max_proc=48, runner='scrapyd.runner'

Scrapyd是一个服务端,我们需要通过一个客户端(Scrapyd-Client)将爬虫项目发送到Scrapyd服务中去。这里先修改一下Scrapyd服务地址,默认Scrapyd启动是通过命令: Scrapyd就可以直接启动,默认绑定的ip地址是127.0.0.1端口是:6800,这里为了其他主机可以访问,需将ip地址设置为0.0.0.0

​ 根据上图启动的信息, 可以看到默认配置文件是在/Users/canon/anaconda3/lib/python3.7/site-packages/scrapyd/中。

1
2
3
4
5
6
7
8
9
10
11
12
13
14
15
16
17
18
19
20
21
22
23
24
25
26
27
28
29
30
31
$ vim default_scrapyd.conf

[scrapyd]
eggs_dir = eggs
logs_dir = logs
items_dir =
jobs_to_keep = 5
dbs_dir = dbs
max_proc = 0
max_proc_per_cpu = 4
finished_to_keep = 100
poll_interval = 5.0
bind_address = 0.0.0.0
http_port = 6800
debug = off
runner = scrapyd.runner
application = scrapyd.app.application
launcher = scrapyd.launcher.Launcher
webroot = scrapyd.website.Root

[services]
schedule.json = scrapyd.webservice.Schedule
cancel.json = scrapyd.webservice.Cancel
addversion.json = scrapyd.webservice.AddVersion
listprojects.json = scrapyd.webservice.ListProjects
listversions.json = scrapyd.webservice.ListVersions
listspiders.json = scrapyd.webservice.ListSpiders
delproject.json = scrapyd.webservice.DeleteProject
delversion.json = scrapyd.webservice.DeleteVersion
listjobs.json = scrapyd.webservice.ListJobs
daemonstatus.json = scrapyd.webservice.DaemonStatus

Scrapyd-Client

Scrapyd-Client可以用来部署Scrapy项目,它会帮我们把项目打包成egg文件,我们不用再动手调用add version.json接口去部署到Scrapyd,操作简单。

安装

1
$ pip install scrapyd-client

配置

​ 要部署Scrapy项目,我们首先需要修改项目的配置文件。首先切换至项目根目录, 会看到有一个scrapy.cfg文件,它的内容如下:

1
2
3
4
5
6
7
8
9
10
11
# Automatically created by: scrapy startproject
#
# For more information about the [deploy] section see:
# https://scrapyd.readthedocs.io/en/latest/deploy.html

[settings]
default = spider_ti.settings

[deploy]
#url = http://localhost:6800/
project = spider_ti

这里需要配置一下deploy部分。例如, 我们将项目部署到10.10.10.1Scrapyd上,则修改内容如下:

1
2
3
[deploy]
url = http://10.10.10.1:6800/
project = spider_ti

这样我们再在scrapy.cfg文件所在路径执行如下命令:

1
2
3
4
5
6
$ scrapyd-deploy

Packing version 1576725163
Deploying to project "spider_ti" in http://localhost:6800/addversion.json
Server response (200):
{"node_name": "CanondeMacBook-Pro.local", "status": "ok", "project": "spider_ti", "version": "1576725163", "spiders": 3}

项目版本默认为当前时间戳。我们也可以指定项目版本,通过version参数传递即可。例如:

1
$ scrapyd-deploy --version 201912191114

注: 在Python3的Scrapyd 1.2.0版本中,版本号不能指定为带字母的字符串,它们必须为纯数字,否则会出现报错。

如果有多台主机,我们可以配置各台主机的别名,修改配置文件为:

1
2
3
4
5
6
7
[deploy:vm1]
url = http://10.10.10.1:6800/
project = spider_ti

[deploy:vm2]
url = http://10.10.10.2:6800/
project = spider_ti

在此统一配置多台主机,一台主机对应一组配置,在deploy后面加上主机的别名即可。如果想将项目部署到IP为10.10.10.2vm2主机,我们只需要执行如下命令:

1
scrapyd-deploy vm2

如此一来,我们只需要在scrapy.cfg文件中配置好各台主机的Scrapyd地址,然后调用scrapyd-deploy命令加主机名称即可实现部署。

如果Scrapyd设置了访问限制,我们可以在配置文件中加入用户名和密码的配置,同时修改端口成Nginx代理端口。例如: 在第1章我们使用的是6801,那么这里就需要改成6801,修改如下:

1
2
3
4
5
6
7
8
9
10
11
[deploy:vm1]
url = http://10.10.10.1:6801/
project = spider_ti
username = admin
password = admin

[deploy:vm2]
url = http://10.10.10.2:6801/
project = spider_ti
username = canon
password = canon

通过加入username和password字段,我们就可以在部署时自动进行Auth验证,然后成功实现部署。

运行

1
$ curl http://127.0.0.1:6800/schedule.json -d project=spider_ti -d spider=ti

列出任务

1
$ curl http://127.0.0.1:6800/listjobs.json?project=spider_ti | python -m json.tool

列出项目

1
$ curl http://127.0.0.1:6800/listprojects.json

停止

1
$ curl http://127.0.0.1:6800/cancel.json -d project=spider_ti -d job=838dec26222311ea8eb6a5eb893a35a5

删除

  • 版本
1
$ curl http://127.0.0.1:6800/delversion.json -d project=spider_ti -d version=1576735972
  • 项目
1
$ curl http://127.0.0.1:6800/delproject.json -d project=spider_ti

参考

Solr RCE CVE-2019-0193

1
2
3
4
5
6
7
8
9
# Solr POST RCE CVE-2019-0193
alert http $EXTERNAL_NET any -> $HOME_NET any (msg:"LOCAL RULES EXPLOIT Solr RCE CVE-2019-0193 POST"; flow:to_server,established; flowbits:set,CVE-2019-0193.post.request; content:"POST"; http_method; fast_pattern; content:"/solr"; http_uri; content:"/config"; http_uri; content:"params.resource.loader.enabled"; http_client_body; classtype:shellcode-detect; sid:3020016; rev:1; metadata:attack_target web_server, signature_severity Critical, direction outside_to_inside, created_at 2019_10_31, updated_at 2019_10_31, author Canon, tag RCE, tag CVE-2019-0193, tag http, tag exploit, tag Solr;)

alert http $EXTERNAL_NET any -> $HOME_NET any (msg:"LOCAL RULES EXPLOIT Solr RCE CVE-2019-0193 POST Successful"; flow:from_server,established; flowbits:isset,CVE-2019-0193.post.request; content:"200"; http_stat_code; classtype:shellcode-detect; sid:3020017; rev:1; metadata:attack_target web_server, signature_severity Critical, direction outside_to_inside, created_at 2019_10_31, updated_at 2019_10_31, author Canon, tag RCE, tag CVE-2019-0193, tag http, tag exploit, tag Solr;)

# Solr GET RCE CVE-2019-0193
alert http $EXTERNAL_NET any -> $HOME_NET any (msg:"LOCAL RULES EXPLOIT Solr RCE CVE-2019-0193 GET"; flow:to_server,established; flowbits:set,CVE-2019-0193.get.request; content:"GET"; http_method; content:"/solr"; http_uri; fast_pattern; content:"/select?"; http_uri; content:"wt=velocity"; http_uri; content:"java.lang.Runtime"; http_uri; content:"getRuntime().exec"; http_uri; classtype:shellcode-detect; sid:3020018; rev:1; metadata:attack_target web_server, signature_severity Critical, direction outside_to_inside, created_at 2019_10_31, updated_at 2019_10_31, author Canon, tag RCE, tag CVE-2019-0193, tag http, tag exploit, tag Solr;)

alert http $EXTERNAL_NET any -> $HOME_NET any (msg:"LOCAL RULES EXPLOIT Solr RCE CVE-2019-0193 GET Successful"; flow:from_server,established; flowbits:isset,CVE-2019-0193.get.request; content:"200"; http_stat_code; classtype:shellcode-detect; sid:3020019; rev:1; metadata:attack_target web_server, signature_severity Critical, direction outside_to_inside, created_at 2019_10_31, updated_at 2019_10_31, author Canon, tag RCE, tag CVE-2019-0193, tag http, tag exploit, tag Solr;)

背景

​ 由于近期网站遭受恶意攻击, 通过对于登录接口的审计与分析, 现已确定了一批可疑账号。既然之前写过一个登录接口的审计脚本, 那么完全可以通过扩展这个脚本来实现对于可疑账号的比对。主要思路: 通过将可疑账号存进Redis中, 再利用Lua脚本调用Redis接口进行账号的比对。

先说一下Suricata默认是存在黑名单机制的, 如下:

1
2
3
4
5
# IP Reputation
#reputation-categories-file: /etc/suricata/iprep/categories.txt
#default-reputation-path: /etc/suricata/iprep
#reputation-files:
# - reputation.list

Suricata 5.0 版本中更是增加了新的功能**Datasets**。大概看了一下, 可以通过在规则中使用datasetdatarep关键字将大量数据与sticky buffer进行匹配。确实是个很赞的功能!

1
2
3
4
5
alert http any any -> any any (http.user_agent; dataset:set, ua-seen, type string, save ua-seen.lst; sid:1;)

alert dns any any -> any any (dns.query; to_sha256; dataset:set, dns-sha256-seen, type sha256, save dns-sha256-seen.lst; sid:2;)

alert http any any -> any any (http.uri; to_md5; dataset:isset, http-uri-md5-seen, type md5, load http-uri-md5-seen.lst; sid:3;)

但是… 这并不适用我现在的场景, 因为在我的场景中, 用户的登录请求存在于POST请求中, 默认的Suricata方法并不能准确定位到我们需要的账号。这个时候我们就只能依赖于Lua脚本来扩展。当然这些需求Zeek也可以满足, 只是…Zeek的脚本真是难写…不忍吐槽~

准备阶段

运行环境

OS: Ubuntu 18.04

Suricata: Suricata 5.0.0 RELEASE

LuaRocks

  1. 由于Ubuntu默认没有安装**LuaRocks** (LuaRocks is the package manager for Lua modules), 这里需要我们手动安装。
1
2
# 通过apt直接安装, 简单省事儿。
$ apt-get install luarocks

  1. 通过luarocks安装我们所需要的lua模块, 这里我们需要用到redis-lualuasocket这两个模块。
1
2
3
4
5
6
7
8
9
10
11
12
13
# Install Modules
$ luarocks install luasocket
$ luarocks install redis-lua

$ ll /usr/local/share/lua/5.1/
total 72
drwxr-xr-x 3 root root 4096 Oct 25 03:35 ./
drwxr-xr-x 3 root root 4096 Sep 17 14:14 ../
-rw-r--r-- 1 root root 8331 Oct 25 03:34 ltn12.lua
-rw-r--r-- 1 root root 2487 Oct 25 03:34 mime.lua
-rw-r--r-- 1 root root 35599 Oct 25 03:35 redis.lua
drwxr-xr-x 2 root root 4096 Oct 25 03:34 socket/
-rw-r--r-- 1 root root 4451 Oct 25 03:34 socket.lua

  1. 安装成功后, 可以简单的测试一下。
  • 利用Docker启动Redis容器
1
$ docker run -ti -d -p 6379:6379 redis
  • 测试脚本hello_redis.lua
1
2
3
4
5
6
7
8
9
10
11
12
13
local redis = require "redis"

local client = redis.connect("127.0.0.1", 6379)

local response = client:ping()
if response == false then
return 0
end

client:set("hello", "world")

local var = client:get("hello")
print(var)
  • 可能会存在环境变量不对导致的报错
1
2
3
4
5
6
7
8
9
10
11
12
13
14
15
16
$ luajit hello_redis.lua
luajit: /usr/local/share/lua/5.1/redis.lua:793: module 'socket' not found:
no field package.preload['socket']
no file './socket.lua'
no file '/usr/local/share/luajit-2.0.5/socket.lua'
no file '/usr/local/share/lua/5.1/socket.lua'
no file '/usr/local/share/lua/5.1/socket/init.lua'
no file './socket.so'
no file '/usr/local/lib/lua/5.1/socket.so'
no file '/usr/local/lib/lua/5.1/loadall.so'
stack traceback:
[C]: in function 'require'
/usr/local/share/lua/5.1/redis.lua:793: in function 'create_connection'
/usr/local/share/lua/5.1/redis.lua:836: in function 'connect'
a.lua:3: in main chunk
[C]: at 0x56508049e440
  • 执行luarocks path --bin 并将结果输入
1
2
3
4
5
$ luarocks path --bin
Warning: The directory '/home/canon/.cache/luarocks' or its parent directory is not owned by the current user and the cache has been disabled. Please check the permissions and owner of that directory. If executing /usr/local/bin/luarocks with sudo, you may want sudo's -H flag.
export LUA_PATH='/home/canon/.luarocks/share/lua/5.1/?.lua;/home/canon/.luarocks/share/lua/5.1/?/init.lua;/usr/local/share/lua/5.1/?.lua;/usr/local/share/lua/5.1/?/init.lua;./?.lua;/usr/local/share/luajit-2.0.5/?.lua'
export LUA_CPATH='/home/canon/.luarocks/lib/lua/5.1/?.so;/usr/local/lib/lua/5.1/?.so;./?.so;/usr/local/lib/lua/5.1/loadall.so'
export PATH='/home/canon/.luarocks/bin:/usr/local/bin:/home/canon/anaconda3/bin:/home/canon/anaconda3/condabin:/usr/local/sbin:/usr/sbin:/usr/bin:/sbin:/bin:/snap/bin'
  • 执行脚本, 将会看到如下输出:
1
2
$ luajit hello_redis.lua
world

CJson

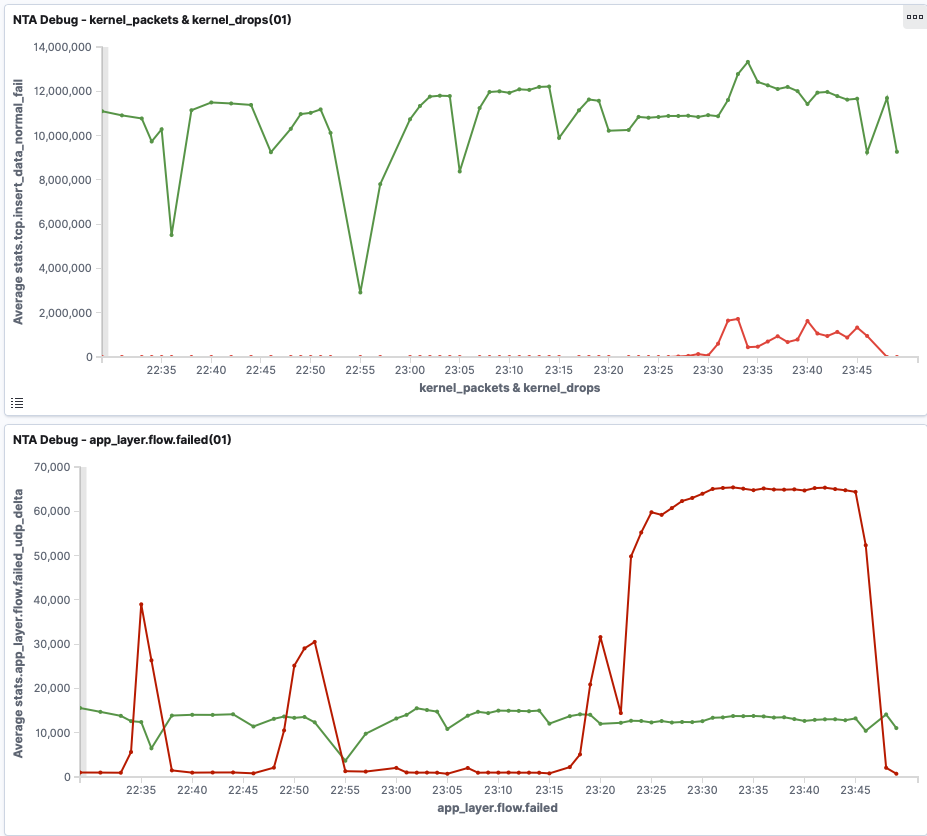
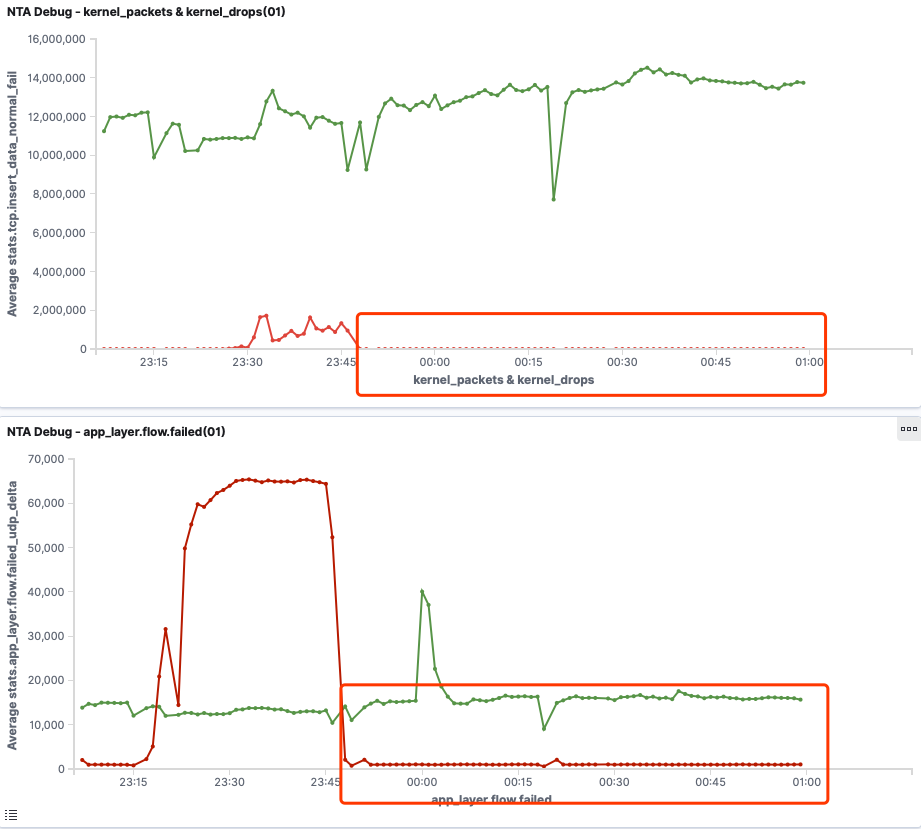
​ 这里强烈建议大家使用CJson模块, 我之前为了测试随便从github上找了个json模块来使用。这几天发现在网站的高峰时期 Suricata app_layer.flow 这个字段非常的大, 从而导致了 kernel_drops。由于我们的网站是面对海外用户有时差, 经过几天的熬夜最终定位到是由于json模块太过于消耗性能而导致。可以看下这个截图:

  • 启用CJson模块之前的监控图

image-20191104103020962

  • 启用CJson模块之后的监控图

image-20191104103557884

  1. 下载CJson模块
1
2
3
4
5
# wget 下载
$ wget https://www.kyne.com.au/~mark/software/download/lua-cjson-2.1.0.tar.gz

# Git
$ git clone git@github.com:mpx/lua-cjson.git

  1. 根据Lua环境修改Makefile(个人配置)
1
2
3
4
5
6
7
8
9
10
11
12
##### Build defaults #####
LUA_VERSION = 5.1
TARGET = cjson.so
PREFIX = /usr/local
#CFLAGS = -g -Wall -pedantic -fno-inline
CFLAGS = -O3 -Wall -pedantic -DNDEBUG
CJSON_CFLAGS = -fpic
CJSON_LDFLAGS = -shared
LUA_INCLUDE_DIR = $(PREFIX)/include/luajit-2.0
LUA_CMODULE_DIR = $(PREFIX)/lib/lua/$(LUA_VERSION)
LUA_MODULE_DIR = $(PREFIX)/share/lua/$(LUA_VERSION)
LUA_BIN_DIR = $(PREFIX)/bin
  1. 安装
1
2
3
4
5
6
7
8
9
10
11
12
13
14
$ make
cc -c -O3 -Wall -pedantic -DNDEBUG -I/usr/local/include/luajit-2.0 -fpic -o lua_cjson.o lua_cjson.c
In file included from lua_cjson.c:47:0:
fpconv.h:15:20: warning: inline function ‘fpconv_init’ declared but never defined
extern inline void fpconv_init();
^~~~~~~~~~~
cc -c -O3 -Wall -pedantic -DNDEBUG -I/usr/local/include/luajit-2.0 -fpic -o strbuf.o strbuf.c
cc -c -O3 -Wall -pedantic -DNDEBUG -I/usr/local/include/luajit-2.0 -fpic -o fpconv.o fpconv.c
cc -shared -o cjson.so lua_cjson.o strbuf.o fpconv.o

$ make install
mkdir -p //usr/local/lib/lua/5.1
cp cjson.so //usr/local/lib/lua/5.1
chmod 755 //usr/local/lib/lua/5.1/cjson.so

MD5

1
$ luarocks install --server=http://luarocks.org/manifests/kikito md5

代码示例

扩展登录接口审计脚本: http_audit.lua

1
2
3
4
5
6
7
8
9
10
11
12
13
14
15
16
17
18
19
20
21
22
23
24
25
26
27
28
29
30
31
32
33
34
35
36
37
38
39
40
41
42
43
44
45
46
47
48
49
50
51
52
53
54
55
56
57
58
59
60
61
62
63
64
65
66
67
68
69
70
71
72
73
74
75
76
77
78
79
80
81
82
83
84
85
86
87
88
89
90
91
92
93
94
95
96
97
98
99
100
101
102
103
104
105
106
107
108
109
110
111
112
113
114
115
116
117
118
119
120
121
122
123
124
125
126
127
128
129
130
131
132
133
134
135
136
137
138
139
140
141
142
143
144
145
146
147
148
149
150
151
152
153
154
155
156
157
158
159
160
161
162
163
164
165
166
167
168
169
170
171
172
173
174
175
176
177
178
179
180
181
182
183
184
185
186
187
188
189
190
191
192
193
194
195
196
197
198
199
200
201
202
203
204
205
206
207
208
209
210
211
212
213
214
215
216
217
218
219
220
221
222
223
224
225
226
227
228
229
230
231
232
233
234
json = require "cjson.safe"
md5 = require "md5"
redis = require "redis"

-- 登录接口
login_url = "/login"
-- 登录错误提示
success_code = 0
-- event_name
event_name = "login_audit"
-- event_type
event_type = "lua"
-- logs
name = "login_audit.json"
-- 协议
proto = "TCP"

-- redis_config
host = "127.0.0.1"
port = 6379

-- common_mapping
http_common_mapping = '{"accept":"accept","accept-charset":"accept_charset","accept-encoding":"accept_encoding","accept-language":"accept_language","user-agent":"user_agent"}'
common_mapping_table = json.decode(http_common_mapping)


-- defind functioin
function md5Encode(args)
m = md5.new()
m:update(args)
return md5.tohex(m:finish())
end

function formatStr(args)
t = {}
ios = string.match(args, 'canon')
if ios ~= nil then
mail = 'email"%s+(.-)%s'
t['email'] = string.match(args, mail)
else
data = string.split(args, '&')
for n, v in ipairs(data) do
d = string.split(v, '=')
t[d[1]] = d[2]
end
end
return t
end

function string.split(s, p)
rt = {}
string.gsub(s, '[^'..p..']+', function(w) table.insert(rt, w) end )
return rt
end

-- default function
function init (args)
local needs = {}
needs["protocol"] = "http"
return needs
end

function setup (args)
filename = SCLogPath() .. "/" .. name
file = assert(io.open(filename, "a"))
SCLogInfo("app_login_audit filename: " .. filename)
http = 0

-- Connect Redis Server
SCLogInfo("Connect Redis Server...")
client = redis.connect(host, port)
response = client:ping()
if response then
SCLogInfo("Redis Server connection succeeded.")
end
end

function log(args)
-- init tables
http_table = {}

-- ti tables
ti = {
tags = {}
}

-- init score
score = 50

-- http_hostname & http_url
http_hostname = HttpGetRequestHost()
http_url = HttpGetRequestUriNormalized()

-- http_method
rl = HttpGetRequestLine()
if rl then
http_method = string.match(rl, "%w+")
if http_method then
http_table["method"] = http_method
end
end

-- 为了保证 Suricata 的性能不受影响, 严格控制过滤条件
if http_url == login_url and http_method == "POST" then
http_table["hostname"] = http_hostname
http_table["url"] = http_url
http_table["url_path"] = http_url

-- http_status & http_protocol
rsl = HttpGetResponseLine()
if rsl then
status_code = string.match(rsl, "%s(%d+)%s")
http_table["status"] = tonumber(status_code)

http_protocol = string.match(rsl, "(.-)%s")
http_table["protocol"] = http_protocol
end

-- login_results
a, o, e = HttpGetResponseBody()
if a then
for n, v in ipairs(a) do
body = json.decode(v)
results_code = tonumber(body["code"])
if results_code == success_code then
http_table["results"] = "success"
else
http_table["results"] = "failed"
end
end
http_table["results_code"] = results_code
end

--[[
1. 获取用户登录email 并查询 Redis中是否存在该账号
2. 根据结果进行相应的打分以及tags标注
]]
--
a, o, e = HttpGetRequestBody()
if a then
for n, v in ipairs(a) do
res = formatStr(v)
if res["email"] then
-- 查询Redis对比黑名单
black_ioc = client:get(res["email"])
if black_ioc then
ti["provider"] = "Canon"
ti["producer"] = "NTA"
table.insert(ti["tags"], "account in blacklist")
score = score + 10
end
end
end
end

-- RequestHeaders
rh = HttpGetRequestHeaders()
if rh then
for k, v in pairs(rh) do
key = string.lower(k)
request_var = request_mapping_table[key]
if request_var then
http_table[request_var] = v
end
end
end

-- ResponseHeaders
rsh = HttpGetResponseHeaders()
if rsh then
for k, v in pairs(rsh) do
key = string.lower(k)
response_var = response_mapping_table[key]
if response_var then
http_table[response_var] = v
end
end
end

-- timestring
sec, usec = SCPacketTimestamp()
timestring = os.date("!%Y-%m-%dT%T", sec) .. '.' .. usec .. '+0000'

-- flow_info
ip_version, src_ip, dst_ip, protocol, src_port, dst_port = SCFlowTuple()

-- flow_id
id = SCFlowId()
flow_id = string.format("%.0f", id)
flow_id = tonumber(flow_id)

-- true_ip
true_client_ip = HttpGetRequestHeader("True-Client-IP")
if true_client_ip ~= nil then
src_ip = true_client_ip
end

-- session_id
tetrad = src_ip .. src_port .. dst_ip .. dst_port
session_id = md5Encode(tetrad)

-- table
raw_data = {
timestamp = timestring,
flow_id = flow_id,
session_id = session_id,
src_ip = src_ip,
src_port = src_port,
proto = proto,
dest_ip = dst_ip,
dest_port = dst_port,
event_name = event_name,
event_type = event_type,
app_type = app_type,
http = http_table,
ti = ti,
score = score
}

-- json encode
data = json.encode(raw_data)

file:write(data .. "\n")
file:flush()

http = http + 1
end

end

function deinit (args)
SCLogInfo ("app_login_audit transactions logged: " .. http);
file:close(file)
end

简单说下以上脚本的功能:

  1. 登录接口的用户名审计(废话…);
  2. 通过请求Redis比对当前用户是否在黑名单中, 并进行相应的打分、标签处理;
  3. 根据自定义的需求获取的http headers, 这个对于业务安全上还是有点用的;
  4. 针对CDN或者Nginx这种场景下, 可以直接对 xff 或者 true_client_ip 进行四元组的hash, 得到session_id, 这样溯源的时候会比较方便。因为在这种场景下传统的四层flow_id就不是那么有用了。
  5. 后续可以追加一些简单的检测方法, 例如:
    1. 检查请求头中的字段是否完成;
    2. 检查请求头中的某个字段长度是否符合合规;
    3. ……

配置Suricata启用Lua脚本

1
2
3
4
5
- lua:
enabled: yes
scripts-dir: /etc/suricata/lua-output/
scripts:
- login_audit.lua

启用Suricata

1
$ suricata -vvv --pfring -k none -c /etc/suricata/suricata.yaml

注: 这里-vvv 参数建议加上. 如果你的Lua脚本有一些问题, 如果加上了这个参数, 就可以通过这个日志看出。

日志样例

1
2
3
4
5
6
7
8
9
10
11
12
13
14
15
16
17
18
19
20
21
22
23
24
25
26
27
28
29
30
31
32
33
34
35
36
37
38
39
40
41
42
43
44
45
46
47
48
49
50
51
52
{
"src_port": 62722,
"score": 65,
"session_id": "c863aeb2ef8d1b37f3257f8c210bf440",
"ti": {
"tags": [
"account in blacklist"
],
"provider": "Canon",
"producer": "NTA"
},
"alert": {
"alerted": true,
"rules": {
"请求头校验": "dev-id"
}
},
"proto": "TCP",
"flow_id": "1064295903559076",
"timestamp": "2019-10-25T08:33:55.585519+0000",
"event_type": "lua",
"src_ip": "1.1.1.1",
"dest_port": 80,
"http": {
"response_content_length": "96",
"response_content_type": "application/json; charset=UTF-8",
"accept_encoding": "gzip",
"accept": "application/json",
"results_code": 400504,
"server": "nginx",
"date": "Fri, 25 Oct 2019 08:33:55 GMT",
"app_version": "6.6.0",
"request_content_type": "application/x-www-form-urlencoded",
"user_agent": "okhttp/3.12.0",
"url": "/login",
"email": "canon@gmail.com",
"results": "failed",
"pragma": "no-cache",-
"cache_control": "no-cache, max-age=0, no-store",
"connection": "keep-alive",
"status": 200,
"protocol": "HTTP/1.1",
"hostname": "x.x.x.x",
"url_path": "/login",
"method": "POST",
"device": "RMX1920 Android8.0.0",
"device_type": "Android",
"request_content_length": "39"
},
"event_name": "login_audit",
"dest_ip": "2.2.2.2"
}

需求:

​ 现有一批高危用户, 需要实时关注该账号的登录情况。由于之前已经写好了一个针对用户登录账号的审计规则, 因此, 这里需要用到**Wazuh CDB list**这个功能(此功能主要用例是创建用户,IP或域名的白/黑列表。)消费审计规则数据即可。


  1. 新建列表
1
2
3
4
5
$ more blacklist

admin:
root:
administrator:
  1. 将列表文件添加到ossec.conf
1
2
3
4
5
6
7
8
$ more ossec.conf

<ossec_config>
<ruleset>
<!-- User-defined CDB list -->
<list>etc/lists/blacklist</list>
</ruleset>
</ossec_config>
  1. 编译列表
1
2
3
$ /var/ossec/bin/ossec-makelists

* File etc/lists/blacklist.cdb needs to be updated
  1. 重启进程
1
$ sudo systemctl restart wazuh-manager
  1. 配置规则
1
2
3
4
5
6
7
8
9
10
11
12
13
14
<group name="local,blacklist,">

<!-- Defind blacklist Rules -->
<!-- ID: 100150 - 100199 -->

<rule id="100163" level="12">
<if_sid>100303</if_sid>
<list field="http.email" lookup="match_key">etc/lists/blacklist</list>
<description>Wazuh Rules - High-risk user login detected. $(src_ip) -> $(http.email) -> $(http.hostname) -> $(http.url) = $(http.results).</description>
<options>no_full_log</options>
<group>blacklist,</group>
</rule>

</group>
  1. 测试规则
1
2
3
4
5
6
7
8
9
$ ./ossec-logtest
2019/10/18 15:06:47 ossec-testrule: INFO: Started (pid: 2184).
ossec-testrule: Type one log per line.

**Phase 3: Completed filtering (rules).
Rule id: '100163'
Level: '12'
Description: 'Wazuh Rules - High-risk user login detected. 1.1.1.1 -> admin -> canon88.github.io -> /user/login = success.'
**Alert to be generated.

​ 自从AWS在6月份新出了Traffic Mirroring功能后, 我也算是第一时间使用了这个功能。与传统的交换机流量镜像不同的是, AWS上是将流量镜像后的数据通过VXLAN协议发送至流量分析引擎(SuricataZeek)。正是由于这一点让我碰到了以下几个问题, 这里写出来希望对大家有所帮助。

  1. 接收流量镜像的目标端, 也就是我们常说的流量分析引擎端是有接收限制的。

​ 如果你是在一个非专用实例上部署的Suricata、Zeek。那么你只能最多同时接收10个源的流量镜像, 也就是你只能接收10个网卡的数据。很不巧的是我们碰上了这个问题, 解决方案也很简单, 使用专用实例(Dedicated instance) 或者 使用AWS的网络负载均衡(Network Load Balancer)。前者可以将Limit提升到100, 后者将不受限。如图:

image-20191016164935291


  1. C5与C4实例的差异

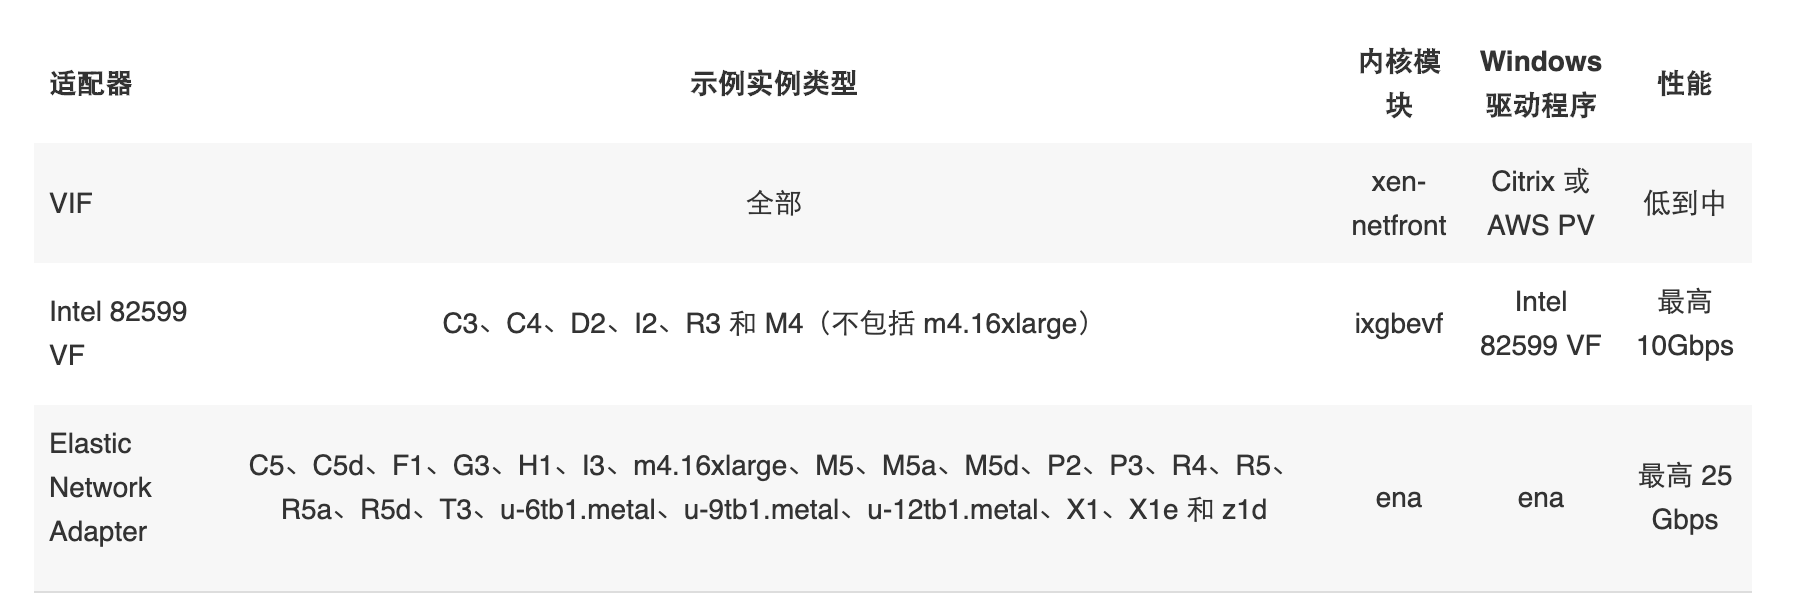
​ 就我目前使用的实例而言, 分别测试过C5 与 C4两种实例。他们的网卡驱动有所区别的, 如图:

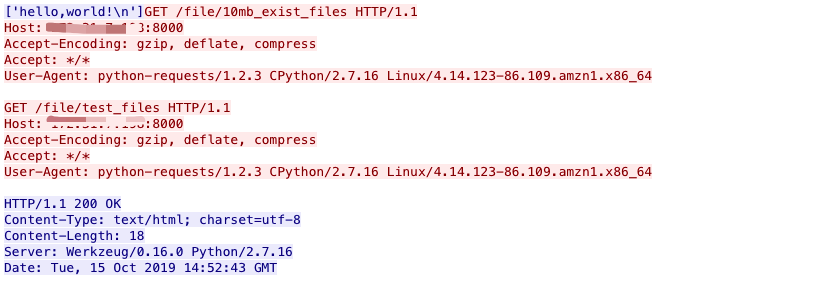
image-20191016160923628

​ 我这使用下来最直观的区别, 在C4实例上若不使用PF_RING捕包模式的话, Suricata丢包率感人, 0.5 Gbps就开始丢包。测试的机器配置: 32C 60G的机器, 切换到PF_RING捕包模式无此问题。反之C5实例就不存在这个问题, AF-PACKET直接上到2 Gbps的纯HTTP流量都没有丢包。硬件配置: 16C 32G的机器。


  1. 超过MTU: 9001数据包被截断

​ 这几天在排查安全事件时, 发现监控的同一台Nginx上解析出的流量(HTTP事件)与日志(HTTP事件)数量相差较大。经过两天的排查终于定位了问题, Suricata kernel 并没有丢包, 所以怀疑是不是Suricata HTTP解析出错导致。最终通过抓包发现导致该问题的”罪魁祸首”就是VXLAN, 由于AWS在流量镜像时采用了VXLAN协议进行封装, 导致在原有MTU的基础上增加了50个字节, 造成数据包被截断, 无法还原出HTTP事件。以下截图就是一个无法被正确还原HTTP事件的数据包, 我用Suricata载入数据包后, 只还原出了长度9015数据包之前的HTTP信息, 长度9015数据包之后的所有事件均无法被还原。

image-20191014095249725

image-20191014094741753

官方描述:

​ For example, if an 8996 byte packet is mirrored, and the traffic mirror target MTU value is 9001 bytes, the mirror encapsulation results in the mirrored packet being greater than the MTU value. In this case, the mirror packet is truncated. To prevent mirror packets from being truncated, set the traffic mirror source interface MTU value to 54 bytes less than the traffic mirror target MTU value. For more information about configuring the network MTU value, see Network Maximum Transmission Unit (MTU) for Your EC2 Instance in the Amazon EC2 User Guide for Linux Instances.

​ 例如,如果对8996字节的数据包进行了镜像,并且流量镜像目标MTU值为9001字节,则镜像封装会导致镜像的数据包大于MTU值。在这种情况下,镜像数据包将被截断。为防止镜像数据包被截断,请将流量镜像源接口的MTU值设置为比流量镜像目标MTU值小54个字节。有关配置网络MTU值的更多信息,请参阅Amazon EC2 Linux实例用户指南中的EC2实例的网络最大传输单位(MTU)。


关于VXLAN导致Suricata无法正常解析数据的问题, 特地进行了测试:

准备工作:

  • 新建了test_files文件, 该文件只包含内容’hello, world!‘;
  • 为了使数据包在传输时满足MTU: 9001, 手动生成了一个10MB空文件10mb_exist_files.

共计访问: 14次

访问顺序:

  1. Client -> Web Server -> test_files 3 (次)
  2. Client -> Web Server -> 10mb_exist_files 1 (次)
  3. Client -> Web Server -> test_files 10 (次)

正常情况:

  • Client -> Web Server -> test_files 3 (次) - 正常
  • Client -> Web Server -> 10mb_exist_files 1 (次) - 正常
  • Client -> Web Server -> test_files 10 (次) - 正常

异常情况:

  • Client -> Web Server -> test_files 3 (次) - 正常
  • Client -> Web Server -> 10mb_exist_files 1 (次) - 异常
  • Client -> Web Server -> test_files 10 (次) - 丢失

MTU: 9001

  • 非镜像流量的数据包详情:

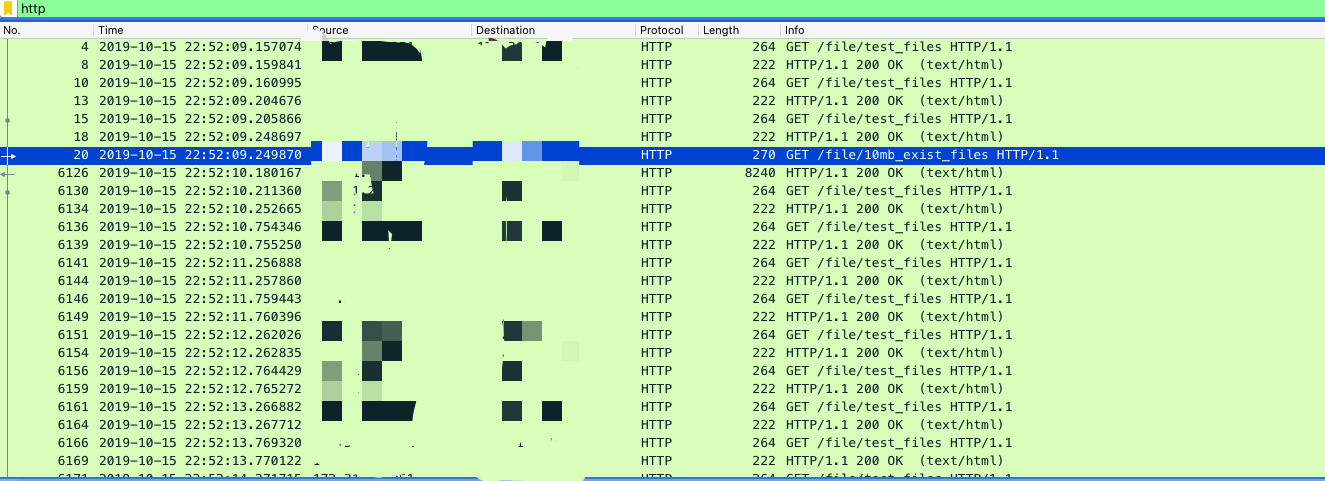
可以看到从数据包20到数据包6126之间都是在进行10MB文件(10mb_exist_files)的传输过程。

image-20191016103409831


从http数据包中可以看出, 这里请求包与响应包都可以正常被还原出来。

image-20191016104502919


数据包在Suricata上的解析结果:

1
2
$ cat http-2019-10-16.json | wc -l
14
1
2
3
4
5
6
7
8
9
10
11
12
13
14
15
16
17
18
19
20
21
22
23
24
25
26
27
28
29
{
"timestamp": "2019-10-15T22:52:10.180505+0800",
"flow_id": 415026399241324,
"pcap_cnt": 6127,
"event_type": "http",
"src_ip": "y.y.y.y",
"src_port": 43418,
"dest_ip": "x.x.x.x",
"dest_port": 8000,
"proto": "TCP",
"tx_id": 3,
"http": {
"hostname": "x.x.x.x",
"http_port": 8000,
"url": "/file/10mb_exist_files",
"http_user_agent": "python-requests/1.2.3 CPython/2.7.16 Linux/4.14.123-86.109.amzn1.x86_64",
"http_content_type": "text/html",
"accept": "*/*",
"accept_encoding": "gzip, deflate, compress",
"content_length": "41943044",
"content_type": "text/html; charset=utf-8",
"date": "Tue, 15 Oct 2019 14:52:10 GMT",
"server": "Werkzeug/0.16.0 Python/2.7.16",
"http_method": "GET",
"protocol": "HTTP/1.1",
"status": 200,
"length": 41943044
}
}

  • 镜像流量的数据包详情:(也就是VXLAN封装后的数据包)

同样可以看到从数据包26到数据包6170之间都是在进行10MB文件(10mb_exist_files)的传输过程。但是在第34个数据包中可以看到, 已经标注了数据超出了最大长度。

image-20191016105636906


超出长度的数据将会被截断, 标注: 50 bytes missing in capture file

image-20191016150322620

从HTTP数据包中可以看出, 这里只有请求包, 由于后续的响应包超出了MTU: 9001, 因此并没有响应包。

image-20191016105948606


数据包在Suricata上的解析结果:

1
2
$ cat http-2019-10-16.json | wc -l
4
1
2
3
4
5
6
7
8
9
10
11
12
13
14
15
16
17
18
19
20
21
22
23
{
"timestamp": "2019-10-15T22:52:48.295823+0800",
"flow_id": 1746715371266426,
"event_type": "http",
"src_ip": "y.y.y.y",
"src_port": 43420,
"dest_ip": "x.x.x.x",
"dest_port": 8000,
"proto": "TCP",
"tx_id": 3,
"http": {
"hostname": "x.x.x.x",
"http_port": 8000,
"url": "/file/10mb_exist_files",
"http_user_agent": "python-requests/1.2.3 CPython/2.7.16 Linux/4.14.123-86.109.amzn1.x86_64",
"accept": "*/*",
"accept_encoding": "gzip, deflate, compress",
"http_method": "GET",
"protocol": "HTTP/1.1",
"status": 200,
"length": 0
}
}

结论:

​ 相比非镜像流量的数据包, Suricata 少了后续10条http请求的数据解析。针对访问10mb_exist_files的请求, 由于超过了MTU, 数据包被阶段了, http的解析数据也是不完整的。

解决方案:

​ 这里直接引用AWS的官方文档描述。如果对8996字节的数据包进行了镜像,并且流量镜像目标MTU值为9001字节,则镜像封装会导致镜像的数据包大于MTU值。在这种情况下,镜像数据包将被截断。为防止镜像数据包被截断,请将流量镜像源接口的MTU值设置为比流量镜像目标MTU值小54个字节。有关配置网络MTU值的更多信息,请参阅Amazon EC2 Linux实例用户指南中的EC2实例的网络最大传输单位(MTU)。

​ 一般来说,降低 MTU 的话,有可能发现网路传输效能有下降,这是因为每个封包 size 变小,所以传送同样的资料量,封包数就会变多,造成 overhead 变多。但是对于传输是不会产生错误的状况的。


MTU:1500

1
2
3
4
5
6
7
8
9
$ ip link show eth0
2: eth0: <BROADCAST,MULTICAST,UP,LOWER_UP> mtu 9001 qdisc mq state UP mode DEFAULT group default qlen 1000
link/ether 02:8a:2d:87:02:8e brd ff:ff:ff:ff:ff:ff

$ sudo ip link set dev eth0 mtu 1500

$ ip link show eth0
2: eth0: <BROADCAST,MULTICAST,UP,LOWER_UP> mtu 1500 qdisc mq state UP mode DEFAULT group default qlen 1000
link/ether 02:8a:2d:87:02:8e brd ff:ff:ff:ff:ff:ff

image-20191016154823748

image-20191016155112376

数据包在Suricata上的解析结果:

1
2
$ cat http-2019-10-16.json | wc -l
14
1
2
3
4
5
6
7
8
9
10
11
12
13
14
15
16
17
18
19
20
21
22
23
24
25
26
27
28
{
"timestamp": "2019-10-16T15:14:15.576656+0800",
"flow_id": 1135596924232203,
"event_type": "http",
"src_ip": "y.y.y.y",
"src_port": 43554,
"dest_ip": "x.x.x.x",
"dest_port": 8000,
"proto": "TCP",
"tx_id": 3,
"http": {
"hostname": "x.x.x.x",
"http_port": 8000,
"url": "/file/10mb_exist_files",
"http_user_agent": "python-requests/1.2.3 CPython/2.7.16 Linux/4.14.123-86.109.amzn1.x86_64",
"http_content_type": "text/html",
"accept": "*/*",
"accept_encoding": "gzip, deflate, compress\n",
"content_length": "41943044",
"content_type": "text/html; charset=utf-8",
"date": "Wed, 16 Oct 2019 07:14:15 GMT",
"server": "Werkzeug/0.16.0 Python/2.7.16",
"http_method": "GET",
"protocol": "HTTP/1.1",
"status": 200,
"length": 41943044
}
}

​ 结论: MTU减小到1500时, 无论从WireShark来查看或者Suricata协议还原的角度来说, 都是可以的。


​ 写在最后, 说实话AWS提供了在云上的流量镜像确实很不错, 至少比传统在云上每一台机器通过安装agent把流量外发的形式强, 似乎国内的云厂商现在也没有这个功能!

​ 不过通过VXLAN将数据包封装后导致MTU超过最大值这问题也确实有点坑。你让已经成型的架构去调整MTU值, 虽然理论上是可行, 但实际生产环境中网络的调整都是比较慎重的, 除非企业现在必须得上流量镜像, 否则不太能说服运维的小伙伴去调整, 要是真出了什么问题, 都是大问题。

参考

背景

​ 由于近期网站遭受大量撞库攻击, 想监控一下登录接口中的异常行为。通过alert并不能起到很好的效果, 所以采用Lua脚本进行扩展, 写了一个审计登录接口的脚本。通过登录接口事件, 再配合Wazuh进行一些简单的关联告警, 效果还是不错的。

需求

  • 由于审计内容涉及到用户敏感信息, 因此需要对敏感信息进行Hash之后再输出;
  • 除通用HTTP Header字段外支持对自定义字段进行选择性输出;

代码

1
2
3
4
5
6
7
8
9
10
11
12
13
14
15
16
17
18
19
20
21
22
23
24
25
26
27
28
29
30
31
32
33
34
35
36
37
38
39
40
41
42
43
44
45
46
47
48
49
50
51
52
53
54
55
56
57
58
59
60
61
62
63
64
65
66
67
68
69
70
71
72
73
74
75
76
77
78
79
80
81
82
83
84
85
86
87
88
89
90
91
92
93
94
95
96
97
98
99
100
101
102
103
104
105
106
107
108
109
110
111
112
113
114
115
116
117
118
119
120
121
122
123
124
125
126
127
128
129
130
131
132
133
134
135
136
137
138
139
140
141
142
143
144
145
146
147
148
149
150
151
152
153
154
155
156
157
158
159
160
161
162
163
164
165
166
167
168
169
170
171
172
173
174
175
176
177
178
179
180
181
182
183
184
185
186
187
188
189
190
191
192
193
194
195
196
197
198
199
200
201
202
203
204
205
206
207
208
209
210
211
212
213
214
215
216
217
218
219
220
221
222
223
224
225
226
227
228
229
230
231
232
233
234
235
236
237
238
239
240
241
242
243
json = require "json"
md5 = require "md5"

-- 登录接口
login_url = "/login"
-- 登录状态码
success_code = 0
-- event_name
event_name = "login_audit"
-- event_type
event_type = "lua"
-- app_type
app_type = "web"
-- logs
name = "web_login_audit.json"

-- common_mapping
http_common_mapping = '{"accept":"accept","accept-charset":"accept_charset","accept-encoding":"accept_encoding","accept-language":"accept_language","accept-datetime":"accept_datetime","authorization":"authorization","cache-control":"cache_control","from":"from","max-forwards":"max_forwards","origin":"origin","pragma":"pragma","proxy-authorization":"proxy_authorization","via":"via","vary":"vary","x-requested-with":"x_requested_with","x-forwarded-proto":"x_forwarded_proto","accept-range":"accept_range","allow":"allow","connection":"connection","content-encoding":"content_encoding","content-language":"content_language","content-location":"content_location","content-md5":"content_md5","content-range":"content_range","date":"date","last-modified":"last_modified","location":"location","proxy-authenticate":"proxy_authenticate","referrer":"refer","retry-after":"retry_after","server":"server","transfer-encoding":"transfer_encoding","upgrade":"upgrade","www-authenticate":"www_authenticate","x-authenticated-user":"x_authenticated_user","user-agent":"user_agent"}'
common_mapping_table = json.decode(http_common_mapping)

-- request_mapping
http_request_mapping = '{"content-length":"request_content_length","content-type":"request_content_type"}'
request_mapping_table = json.decode(http_request_mapping)

-- response_mapping
http_response_mapping = '{"content-length":"response_content_length","content-type":"response_content_type"}'
response_mapping_table = json.decode(http_response_mapping)

-- defind functioin
function md5Encode(args)
m = md5.new()
m:update(args)
return md5.tohex(m:finish())
end

function urlDecode(args)
s = string.gsub(args, "%%(%x%x)", function(h) return string.char(tonumber(h, 16)) end)
return s
end

-- email=xxx@yyy.com&password=zzz
function formatStr(args)
t = {}
data = string.split(args, '&')
for n, v in ipairs(data) do
d = string.split(v, '=')
t[d[1]] = d[2]
end
return t
end

function string.split(s, p)
local rt = {}
string.gsub(s, '[^'..p..']+', function(w) table.insert(rt, w) end )
return rt
end

function trim(s)
return (string.gsub(s, "^%s*(.-)%s*$", "%1"))
end

function formatCookie(args)
t = {}
data = string.split(args, ";")
for n, v in ipairs(data) do
v = trim(v)
d = string.split(v, "=")
t[d[1]] = d[2]
end
return t
end

-- default function
function init (args)
local needs = {}
needs["protocol"] = "http"
return needs
end


function setup (args)
filename = SCLogPath() .. "/" .. name
file = assert(io.open(filename, "a"))
SCLogInfo("Web Login Log Filename " .. filename)
http = 0
end


function log(args)

-- init tables
http_table = {}

-- http_hostname
http_hostname = HttpGetRequestHost()
http_table["hostname"] = http_hostname

-- http_url
http_url = HttpGetRequestUriNormalized()
if http_url ~= login_url then
return
end
http_table["url"] = login_url

-- http_url_path
http_table["url_path"] = http_url

-- http_method
rl = HttpGetRequestLine()
http_method = string.match(rl, "%w+")
http_table["method"] = http_method

-- http_status
rsl = HttpGetResponseLine()
status_code = string.match(rsl, "%s(%d+)%s")
http_status = tonumber(status_code)
http_table["status"] = http_status

-- http_protocol
http_protocol = string.match(rsl, "(.-)%s")
http_table["protocol"] = http_protocol

-- request_token
cookie = HttpGetRequestHeader("Cookie")
if cookie ~= nil then
session_id = string.match(cookie, "sessionID=(.-);")
if session_id ~= nil then
http_table["request_token"] = md5Encode(session_id)
else
http_table["request_token"] = nil
end
end

-- response_token && member_id
set_cookie = HttpGetResponseHeader("Set-Cookie")
if set_cookie ~= nil then
session_id = string.match(set_cookie, "sessionID=(.-);")
http_table["response_token"] = md5Encode(session_id)
member_id = string.match(set_cookie, "memberId=(.-);")
http_table["member_id"] = tonumber(member_id)
end

-- login_results
a, o, e = HttpGetResponseBody()
for n, v in ipairs(a) do
body = json.decode(v)
results_code = tonumber(body["code"])
if results_code == success_code then
results = "success"
else
results = "failed"
end
end
http_table["results"] = results
http_table["results_code"] = results_code

-- email & password
a, o, e = HttpGetRequestBody()
for n, v in ipairs(a) do
res = formatStr(v)
mail = urlDecode(res['email'])
pass = md5Encode(res['password'])
end
http_table["email"] = mail
http_table["password"] = pass

-- RequestHeaders
rh = HttpGetRequestHeaders()
for k, v in pairs(rh) do
key = string.lower(k)

common_var = common_mapping_table[key]
if common_var ~= nil then
http_table[common_var] = v
end

request_var = request_mapping_table[key]
if request_var ~= nil then
http_table[request_var] = v
end
end

-- ResponseHeaders
rsh = HttpGetResponseHeaders()
for k, v in pairs(rsh) do
key = string.lower(k)

common_var = common_mapping_table[key]
if common_var ~= nil then
http_table[common_var] = v
end

response_var = response_mapping_table[key]
if response_var ~= nil then
http_table[response_var] = v
end
end

-- timestring = SCPacketTimeString() 2019-09-10T06:08:35.582449+0000
sec, usec = SCPacketTimestamp()
timestring = os.date("!%Y-%m-%dT%T", sec) .. "." .. usec .. "+0000"

ip_version, src_ip, dst_ip, protocol, src_port, dst_port = SCFlowTuple()

-- flow_id
id = SCFlowId()
flow_id = string.format("%.0f", id)

-- true_ip
true_client_ip = HttpGetRequestHeader("True-Client-IP")
if true_client_ip ~= nil then
src_ip = true_client_ip
end

-- table
raw_data = {
timestamp = timestring,
flow_id = flow_id,
src_ip = src_ip,
src_port = src_port,
dest_ip = dst_ip,
dest_port = dst_port,
event_name = event_name,
event_type = event_type,
app_type = app_type,
http = http_table,
proto = "TCP"
}

-- json encode
data = json.encode(raw_data)

file:write(data .. "\n")
file:flush()

http = http + 1
end


function deinit (args)
SCLogInfo ("HTTP transactions logged: " .. http);
file:close(file)
end

示例

1
2
3
4
5
6
7
8
9
10
11
12
13
14
15
16
17
18
19
20
21
22
23
24
25
26
27
28
29
30
31
32
33
34
35
36
37
38
39
40
41
42
43
44
{
"src_port": 34963,
"event_type": "lua",
"proto": "TCP",
"flow_id": "471693756052529",
"timestamp": "2019-10-07T13:51:01.560556+0000",
"event_name": "login_audit",
"dest_port": 3007,
"http": {
"response_content_length": "446",
"response_content_type": "application/json; charset=utf-8",
"accept_encoding": "gzip",
"accept": "*/*",
"server": "nginx",
"results_code": 0,
"vary": "Accept-Encoding",
"password": "420ce28ef813a2dc05e52a7e24eb0d5c",
"date": "Mon, 07 Oct 2019 13:51:01 GMT",
"request_content_type": "application/x-www-form-urlencoded; charset=UTF-8",
"accept_language": "en-US,en;q=0.9",
"url": "/login",
"x_requested_with": "XMLHttpRequest",
"x_forwarded_proto": "https",
"user_agent": "Mozilla/5.0 (Macintosh; Intel Mac OS X 10_14_6) AppleWebKit/537.36 (KHTML, like Gecko) Chrome/77.0.3865.90 Safari/537.36",
"origin": "https://www.canon.com",
"response_token": "4f5f386aec34e877ce63fce7ddd3f15f",
"pragma": "no-cache",
"connection": "close",
"status": 200,
"protocol": "HTTP/1.1",
"hostname": "www.canon.com",
"url_path": "/login",
"cache_control": "no-cache, max-age=0, no-store, must-revalidate",
"method": "POST",
"email": "admin@canon.com",
"request_token": "109464370570b23fa9768078ab1ac8a9",
"member_id": 123456,
"results": "success",
"request_content_length": "49"
},
"src_ip": "77.99.22.17",
"dest_ip": "1.1.1.1",
"app_type": "web"
}